1300 760 441
 cs@factoryfast.com.au
Monitor Mounts and Arms Buyer Guide: How to Match Your Screens, Desk and Work Style
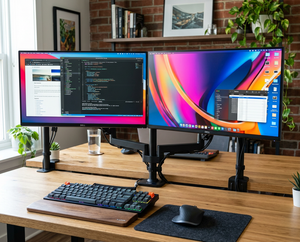

A monitor arm can clear bulky screen bases from a desk, make display positioning easier and give a multi-screen setup a more deliberate layout. Those benefits only arrive when the mount fits both the monitors and the furniture beneath them. A screen that falls within a stated size range can still be too heavy, use the wrong rear mounting pattern or sit beyond the arm’s useful reach. A suitable display bracket can also be a poor match for a desk with a deep rear rail, restricted edge access or insufficient space behind it.
That is why choosing from monitor mounts, arms and stands should begin with compatibility rather than appearance. Count the screens, record their individual specifications and inspect the desktop from above and below. Then decide how the displays need to move during work. If the mount is part of a broader room setup, the wider office furniture range can help you coordinate the desk, seating, storage and screen support as one practical workspace.
Begin with the three monitor details that determine compatibility
Monitor size is useful, but it is not enough to confirm a fit. The three details that matter together are the diagonal screen size, the weight of the monitor without its original base and the spacing of the threaded mounting holes on the rear. A mount must accommodate all three.
Count the screens before comparing arm designs
A single-screen setup leaves the most freedom to position one display centrally. A dual monitor mount is designed to carry two screens from one mounting point, while a triple configuration extends the layout further across the desk. Choose for the number of monitors that will actually be installed, not a future arrangement that may never happen. Extra arms add width, hardware and load to the mounting point even when they are not immediately useful.
Screen count also changes the best layout. Two matching displays can form a balanced side-by-side pair. One main screen and a smaller secondary display may work better with independent arms, allowing the smaller unit to sit in portrait orientation or at a different height. Three screens need enough arm span and desk width to create a readable arc without pushing the outer panels beyond a comfortable viewing zone.
Check the weight of every monitor without its original stand
Load limits are normally stated per arm. Treat that figure as an individual compatibility rule rather than combining the weights of two lighter monitors and comparing them with a total. If one display exceeds the permitted load, the other being lighter does not make the arrangement suitable.
Some adjustable mechanisms also state a minimum supported weight. A monitor below that minimum may not balance as intended because the spring tension is designed for a defined load band. Use the monitor manufacturer’s listed weight without its supplied base where available, and include any accessory that will remain attached to the screen when assessing the load on the arm.
Match the rear mounting-hole pattern exactly
VESA compatibility describes the horizontal and vertical distance between the threaded holes on the back of a compatible monitor. Common mounts in the current Factory Fast range accept 75 x 75 mm and 100 x 100 mm patterns. Measure centre to centre, or confirm the pattern in the screen specifications, before ordering.
Do not assume that a flat back means the holes will be easy to reach. Recessed mounting points, curved housings and connectors located close to the bracket area can affect how the plate and cables sit. Check whether the product includes the relevant mounting hardware, then inspect the screen manufacturer’s fitting information for any spacers or model-specific requirements.
Choose the arm count and adjustment style for the way you work
The best monitor bracket is not necessarily the one with the greatest range of motion. It is the one that supports the positions used during a normal workday without forcing the desk away from the wall or placing the screen over important work space.
Single-screen support suits focused, central work
A single adjustable arm makes sense when one monitor is the clear centre of the workstation. It can help reclaim the space occupied by a broad original stand and allows the display to be moved for seated work, shared viewing or a change in task. A single arm also places less visual and mechanical bulk around the mounting point than a multi-screen system.
Before choosing, consider whether the screen needs to move forward as well as up and down. Height adjustment alone may not solve a shallow or unusually deep desk. Arm reach, joint placement and the distance between the user and the display all influence whether the final position feels natural.
Dual arms suit side-by-side work and mixed orientations
Two screens are often used for comparison, reference material, communication or keeping one application visible while working in another. Independent movement matters when the monitors differ in size or when one needs to rotate vertically.
The spring-assisted dual monitor desk mount supports two screens measuring 43.18 to 81.28 cm diagonally and weighing 2 to 5 kg per arm. Its plates accept 75 x 75 mm and 100 x 100 mm mounting patterns. Each arm offers tilt from +90° to -45°, swivel of ±90° and rotation of ±180°. This model suits a buyer whose two screens fall within a moderate weight band and whose desk edge is 10 to 50 mm thick.
A dual arrangement should also account for the width of the bezels and the preferred gap between displays. Arm specifications can confirm compatibility, but the physical screen widths determine how neatly the pair meets in the centre and how far the outer edges extend.
Triple mounts need more than a third compatible screen
A three-display layout can be useful when the work genuinely benefits from several applications remaining visible. It also requires a desk and room layout that can accommodate the full span. The outer arms need space to angle inward, and the user should be able to turn towards them without the screens colliding with a wall or shelving.
The triple monitor stand is designed for three compatible displays measuring 33.02 to 81.28 cm diagonally, with a stated load of up to 8 kg per arm. It accepts 75 x 75 mm and 100 x 100 mm mounting patterns and allows tilt, swivel and 360° rotation. Its clamp replaces three separate bases, but the buyer still needs to confirm desk-edge suitability and the clear width required by the complete screen arrangement.
Inspect the desk as carefully as the monitors
A desk-mounted arm concentrates screen load at a clamp or grommet point. The surface therefore needs the correct thickness, accessible mounting space and a suitable edge profile. A compatible monitor does not compensate for an incompatible desktop.
Measure the edge and look underneath
Use a tape measure to record the actual desktop thickness. Then inspect the underside at the intended position. Frames, modesty panels, drawers, cable trays and reinforcing rails can block the lower part of a clamp even when the edge looks clear from above. A bevelled or rounded edge may also reduce the flat contact area available to the clamp pads.
The current gas-spring dual monitor desk mount offers both C-clamp and grommet installation. It supports two monitors measuring 25.4 to 68.58 cm diagonally, up to 4.4 kg per arm, and fits the same two common rear-hole patterns. Its stated maximum desktop thickness is 10.16 cm. That generous thickness allowance does not remove the need to check underside access, surface shape and the exact mounting location.
Decide between a clamp and a grommet installation
A clamp attaches at an accessible desk edge and can suit users who do not want to use a cable hole or another opening through the work surface. It needs enough flat space above and below the desktop, as well as room behind the desk to tighten and position the hardware.
A grommet method fixes through a suitable opening in the desktop. It can place the mount away from the rear edge when the product and desk allow it, but the hole position determines where the arm begins. Confirm the required opening dimensions and supplied parts on the exact product page. Never assume that a cable opening will automatically suit the mounting hardware.
If the current desk fails these checks, compare computer desks and tables with monitor mounting in mind. The dedicated desk buyer guide explains why desktop depth, thickness, edge access and material construction need to be considered together. This is especially important for height-adjustable desks, where the screens, arms and cables all travel with the desktop.
Check the material and condition at the mounting point
The mounting area should be flat and in good condition. A hollow section, damaged edge or decorative lip can prevent the hardware from sitting as designed. The desk’s overall size does not reveal the construction at one concentrated attachment point, so inspect the exact location rather than judging by appearance.
If the product instructions call for a particular installation arrangement, follow that guidance. Where the desk construction is unclear, confirm it before attaching valuable screens. The correct response to uncertain furniture is not to tighten the clamp harder; it is to verify whether the surface and fitting method are suitable.
Compare movement by the positions you need, not the largest angle
Adjustment figures become useful when they are connected to real tasks. Tilt changes the vertical angle of the display. Swivel turns it left or right. Rotation can change a compatible screen between landscape and portrait orientations. Arm extension moves the screen closer or farther away, while vertical travel affects its height.
Height range and reach solve different problems
Vertical movement helps align the display with the user and other screens. Forward reach changes viewing distance and can bring a monitor over a deep desktop. A mount may offer ample height but limited forward positioning, or the reverse. Sketch the desired screen centre in side view and compare that position with the arm’s pivot points and travel.
For a sit-stand desk, test both working heights conceptually before buying. The screen should remain usable as the desktop moves, and the cables need enough slack for the complete travel path. A mount attached to the moving top keeps the display and keyboard relationship more consistent, but the combined arrangement must remain clear of nearby walls, shelves and storage.
Rotation is useful only when the full screen can clear the desk
Portrait orientation can suit long documents, code, schedules or communication feeds. The screen must have enough clearance to rotate without striking the desktop, another monitor or a shelf. Its cable connectors also need space to move through the turn.
With unequal monitors, independent arms allow each display to be positioned according to its own height and shape. Matching the top edges is not always the best objective. Aligning the active viewing areas or the main content zones can produce a more useful layout when bezels and panel dimensions differ.
Spring assistance should match the stated weight band
Gas-spring and spring-assisted mechanisms are intended to make repositioning smoother once adjusted for a compatible screen. They are not a substitute for checking load limits. An arm carrying a monitor outside its specified band may not hold the chosen position as intended.
After installation, adjustment should follow the product instructions. Set the tension for the fitted monitor rather than repeatedly forcing a joint that resists movement. If two screens differ in weight, tune each adjustable arm for its own display where the design permits independent adjustment.
Plan the screen arrangement before clearing the desk
The mounting system changes more than the height of a monitor. It determines how much surface space is reclaimed, where cables descend and whether the displays can move without interfering with lamps, shelves, speakers or storage.
Map each screen to a task
Give every display a clear role. A main monitor may sit directly ahead for concentrated work, while a secondary one holds reference material at a slight inward angle. In a three-screen setup, the centre panel usually deserves the most direct position, with the outer displays supporting genuinely distinct tasks.
This task map helps prevent buying more arms than the work requires. It also reveals whether one wide display on a single mount would suit the workflow better than several smaller panels. The right choice is defined by usable information placement, not by the maximum number of screens the desk can physically hold.
Draw the footprint in plan view
Measure each screen’s full width, not only its diagonal dimension. Mark the desk width, wall position and any nearby furniture on paper. Add the likely arm pivot and draw the displays in their working positions. This simple plan exposes collisions that product size ranges cannot show.
Allow for the depth created when arms fold behind the screens. Pushing a desk close to a wall can force articulated joints sideways, changing the attainable screen position. If the workspace is in a shallow room or an alcove, rear clearance may decide between a compact pole-style arrangement and arms with greater extension.
Treat cable paths as part of the moving layout
Integrated cable management can guide leads along an arm, but it cannot add length. Check the route from each screen to power and connected equipment at the arm’s farthest intended position. Leave controlled slack at moving joints and avoid pulling connectors sideways when the display rotates.
Keep power and data leads identifiable so a future equipment change does not require dismantling the complete mount. Where a sit-stand desk is involved, assess the cable path at both the lowest and highest positions before fastening the final route.
Avoid the buying mistakes that cause poor monitor-arm results
The most common errors occur before installation. Buyers compare screen size but miss weight, confirm the rear-hole pattern but ignore desk access, or focus on motion angles without checking the space in which the arm must move.
Do not buy from the screen diagonal alone
Two monitors with the same diagonal measurement can have different weights, housing shapes and mounting points. Screen size is an initial filter, not final proof of compatibility. Check the complete set of specifications for each display.
Do not use a combined load to excuse an overweight screen
For multi-arm products, remain within the stated capacity of every arm. One heavy display and one light display are not automatically suitable simply because their total seems reasonable. Individual mechanisms carry individual screens.
Do not overlook rear and underside obstructions
A wall may stop an arm folding into the required position. A desktop rail may block the clamp. A shelf may prevent portrait rotation. Inspect the full movement envelope above, below and behind the desk before selecting the mounting method.
Do not assume all included hardware suits every monitor
Confirm the monitor’s own fitting requirements and the mount’s included components. Recessed holes or unusual rear housings may need a solution specified for that screen. Avoid improvised hardware that changes how the plate bears against the monitor.
Do not plan cable length from the final static position
Route calculations should cover the arm’s movement, not only its preferred resting place. A screen that can swivel or extend may pull a cable tight long before reaching the mount’s mechanical limit. The usable range is whichever limit comes first: arm movement, furniture clearance or cable reach.
Use a final compatibility check before ordering
Work through the decision in a fixed order. Confirm screen count, then check each monitor’s diagonal size, stand-free weight and VESA pattern. Record the desk thickness, clear edge depth, underside obstructions and available space behind the worktop. Compare those measurements with the exact product specifications, then assess movement and cable routing.
When several products remain compatible, choose according to the hardest constraint. A heavy screen makes per-arm capacity decisive. A shallow room makes folded arm depth important. A desk with a blocked rear edge may make the supplied mounting options the deciding factor. A mixed-size dual setup places more value on independent adjustment than a matching pair used in one fixed position.
Before placing the order, take one photo of each monitor’s rear label and mounting holes, plus one photo of the desk edge and underside with a tape measure visible. Keep those images beside your shortlist. They create a quick evidence pack for checking hole spacing, screen identity, desktop thickness and clamp clearance without relying on memory or moving the equipment repeatedly.
Frequently Asked Questions
How do I know whether my monitor will fit a monitor arm?
Check three specifications: the screen’s diagonal size, its weight without the original stand and its rear VESA mounting pattern. All three must fall within the mount’s stated limits. Also inspect whether the mounting holes are recessed and whether nearby ports could be obstructed by the plate. A matching screen size alone does not confirm that the monitor and arm are compatible.
Can a desk monitor mount attach to any desk?
No. A clamp mount needs a desktop within its stated thickness range, a flat contact area and enough clear space beneath the edge for the lower hardware. Frames, cable trays, drawers and bevelled edges can interfere. A grommet fitting requires a suitable opening and compatible desktop construction. Measure the intended mounting point and inspect it from above and below before choosing.
Is a gas spring monitor arm worth choosing?
This adjustment style is useful when you expect to reposition a compatible screen regularly. It can make height, reach and angle changes smoother once the tension is correctly set for the monitor’s weight. For a display that will remain fixed, extensive movement may be less important than simple fit and stability. Always keep the screen within the mechanism’s stated load band.
Can a dual monitor mount hold two different-sized screens?
It can when each monitor independently meets the arm’s size, weight and VESA requirements. Separate arms can help align displays with different housings, although equal top edges may not produce equal active viewing heights. Measure both screens fully and check that their widths will fit without collisions. The heavier monitor must remain within the capacity of its own arm, regardless of the lighter screen.
What does VESA mean when buying a monitor bracket?
VESA refers to the spacing between the threaded mounting holes on the rear of a compatible display. A 75 x 75 mm pattern has hole centres 75 mm apart horizontally and vertically; 100 x 100 mm uses 100 mm spacing. The monitor and bracket must list the same pattern. Measure centre to centre or confirm the value in the monitor’s specifications before ordering.
How much space should I leave behind a desk for monitor arms?
There is no single clearance that suits every arm because folded depth, extension and pivot geometry vary. Measure the space available between the desktop and wall, then compare it with the product dimensions and intended screen position. Remember that articulated joints may project behind the monitor when folded. Include room for power and data cables so connectors are not compressed or pulled during adjustment.
 Tags: