1300 760 441
 cs@factoryfast.com.au
How to Plan a Garage Gym Layout: Zones, Spacing and Equipment Placement
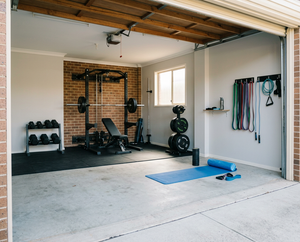

The most expensive garage gym layout mistakes usually happen before the first workout. Equipment is ordered from individual product dimensions, only for the owner to discover that a bench cannot roll into position, a barbell conflicts with shelving or the garage door mechanism occupies the ceiling space needed for a rack.
A better garage gym setup begins with the room, the training program and the movements that need to happen inside it. Once those constraints are mapped, equipment choices become easier: fixed stations can be placed where they will not obstruct access, movable items can share open floor space, and storage can be positioned around the actual workout sequence.
This project-planning guide explains how to create a functional home gym floor plan for an Australian garage, whether the space remains shared with a vehicle or becomes a dedicated training area.
Start with a training brief, not an equipment list
Before measuring equipment, decide what the garage gym must allow you to do. A strength-focused setup has different spatial priorities from a mobility area, boxing station or general fitness room.
Write down the exercises that will appear most often in your weekly routine. Separate them into movements that require permanent equipment, movements that need open floor space and exercises that can share the same station.
Identify the primary training style
For barbell training, the main layout questions involve rack height, bar clearance, bench positioning, plate storage and room to load each end of the bar. A full power rack may become the fixed centre of the room.
Dumbbell-focused training needs less permanent infrastructure but more flexible floor space. The bench should be easy to reposition, while weights need a nearby home that does not interrupt walking paths.
Circuit, mobility and bodyweight sessions benefit from a clear central zone. Equipment should be stored along the perimeter so that mats, steps, resistance accessories and portable weights can move in and out as required.
If several people will use the garage, plan around the most space-intensive regular session rather than the smallest workout. This reduces the chance of building a layout that works for light sessions but becomes cramped when a barbell, bench or cable station is introduced.
Decide whether the garage remains shared
A shared garage needs a reset plan. Identify which equipment can remain assembled, what must move after every workout and where each portable item will be stored.
Heavy racks, cable stations and loaded plate trees are better treated as permanent features. Folding benches, adjustable dumbbells and mats can support a more flexible arrangement. If a vehicle will continue using the garage, mark its complete parking footprint and the path needed to reach doors, storage and household access points.
The key decision is whether the gym occupies a permanent side zone or is assembled in the vehicle bay after the car is moved. Avoid creating a plan that depends on shifting several heavy items before every workout; excessive setup friction often makes the space less practical to use.
Measure the complete garage envelope
Record the usable length, width and height rather than relying on nominal garage size. Permanent shelving, steps, skirting, wall-mounted controls, pipes and door hardware can all reduce the functional area.
Sketch the room to scale and note the location of power points, lights, windows, doors and fixed storage. Mark any surface that cannot be drilled into or obstructed.
Check ceiling height and overhead obstructions
Measure from the finished floor to the lowest overhead obstruction, not simply to the ceiling. An open garage door, door tracks, motors, beams and suspended storage may sit considerably lower.
This is especially important for power racks, pull-up stations and cable systems. The current home gym power rack with lat pulldown and pulley system, for example, is 210 cm high. Its main rack measures 126 cm wide and 115 cm deep, but the working dimensions increase to 213 cm wide and 160 cm deep when the band pegs and dip handles are fitted.
Those figures show why a product’s basic frame size is only the first measurement. Attachments, the user’s body position and the direction of each exercise expand the true operating zone.
Measure doors, access paths and storage openings
A rack may fit against a wall while blocking access to a cupboard. A bench may clear the equipment but prevent an internal door from opening. Barbell sleeves can also project into the route between the garage and the house.
Map every door swing and keep frequently used household storage accessible. If bins, gardening equipment or tools pass through the space, include their movement path in the plan rather than assuming people alone need clearance.
Also check how boxed equipment will enter the garage. Large components may fit comfortably once assembled but be difficult to carry through a narrow side door or around a tight corner.
Draw movement envelopes, not just footprints
For every major item, draw two outlines: its stored footprint and its operating footprint. The operating version should include attachments, adjustment points and the positions required to mount, load or move around the equipment.
A bench needs room to roll in front of a rack, align under the bar and move out again for squats. A cable station needs space in front for the user to step back. Dumbbell movements may require clear space on both sides of the bench.
This approach reveals conflicts that are invisible when a floor plan shows equipment bases alone.
Divide the garage gym layout into working zones
A practical garage gym generally works best when the floor plan is organised by activity. The zones can overlap, but each should have a clear primary purpose.
Fixed strength zone
Place the largest, least mobile equipment first. This may include a power rack, squat stand, cable station or multi-function gym.
Explore squat and power racks only after confirming ceiling height, working width, bench alignment and attachment clearance. Positioning the rack near a wall can preserve the centre of the garage, but leave access wherever plates, cables or adjustments need to be reached.
Think about the exercises performed outside the frame as well as those performed inside it. Rows, pulldowns, dips and band work may extend into a different part of the room from squats and presses.
Flexible lifting zone
The space directly in front of the fixed station can often double as a dumbbell, kettlebell and bench area. This overlapping arrangement is efficient because those activities usually occur at different points in a workout.
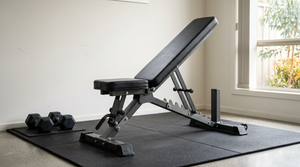
Movable weight and workout benches are particularly useful in a mixed-purpose garage. A bench can move into the rack for pressing, rotate into open space for dumbbell exercises and return to the wall after training.
The linked six-position model measures 111 x 42 x 112 cm when extended and folds to 112 x 42 x 20 cm. Rear wheels and a 9.5 kg product weight make it easier to reposition, while its stated 100 kg maximum capacity must be assessed against the intended user and exercise load.
Open movement zone
Preserve a clear area for warm-ups, floor exercises, mobility work and movements that do not require a station. This zone can also provide the stepping space required for lunges, carries or resistance-band work.
Avoid filling every visible gap with equipment. An empty section of floor is a working asset, not wasted space. It allows the same garage gym layout to support more training styles and makes later changes easier.
Weight and accessory storage zone
Storage should sit close to where the equipment is used without intruding into the lifting area. Place plates near the rack, dumbbells near the bench zone and small attachments where they can be identified without unpacking a deep container.
When browsing home gym weights, account for storage at the same time as the weights themselves. Loose plates resting against a wall consume useful floor edges and make load changes slower.
For Olympic plates with 50 mm centre holes, the linked 250 kg storage rack provides seven 18 cm spokes. Concentrating plates on a dedicated holder can reduce scattered storage, although the loaded unit should be positioned where it will not need regular relocation.
Choose equipment that earns its floor space
A garage gym does not need to reproduce every station found in a larger training facility. The strongest layouts use a smaller number of compatible items to cover the movements that matter most.
Begin with home gym equipment that supports the core training plan, then assess each additional purchase by asking three questions:
- Does it add a movement that the current setup cannot perform effectively?
- Can it share an existing zone?
- Where will it live between sessions?
An item that has no clear stored position should not enter the plan simply because it can fit temporarily.
Compare one multi-function station with several separate items
A rack with pulley functions can consolidate squats, presses, pull-ups, rows and pulldowns into one fixed zone. This can be efficient for a dedicated strength space, but its attachments create a wider operating envelope than the frame alone suggests.
Separate stands and portable accessories offer greater flexibility and may suit a shared garage. The trade-off is more setup time, more individual storage locations and a greater chance that components spread across the floor.
Choose according to how the garage will be used every day, not according to the maximum number of theoretical exercises.
Treat mobile equipment as part of the layout system
Folding or wheeled equipment is useful only when there is a convenient destination for it. Measure the wall space, shelving bay or under-bench clearance intended for storage before purchasing.
A folded item that blocks a power point or internal doorway has not genuinely saved space. Similarly, a bench that is light enough to move but awkward to steer around a rack may become a permanent obstruction.
Map both the working and resting positions for every mobile piece.
Plan the floor, lighting and garage conditions
Garage surfaces and environmental conditions influence equipment placement. Check the floor for slopes, uneven joins and areas affected by water before deciding where fixed stations will sit.
Use flooring according to activity
The base beneath a rack or bench should provide a stable, level working surface. Any additional covering must suit the equipment feet and should not introduce movement between adjoining sections.
Plan flooring as zones if the garage serves several purposes. The lifting area may need a different surface treatment from the vehicle path or mobility space. Ensure added floor thickness does not create problems at doors or reduce already limited overhead clearance.
Work with ventilation and moisture
Australian garages can become hot, humid or dusty depending on location and construction. Keep equipment away from points where wind-driven rain, garden irrigation or water from a parked vehicle may reach it.
Allow air to circulate around stored items and avoid pressing soft equipment tightly against a wall that becomes damp. Wipe down metal surfaces and padded equipment after training, and check fasteners and moving parts as directed in the product instructions.
Ventilation should be planned before tall equipment occupies the most suitable fan or airflow position.
Position lighting for the user, not the empty room
A central ceiling light may be blocked by a rack or place the user in shadow. Test the lighting from the positions used for squats, bench work, cable exercises and floor movements.
Keep power leads outside walking and lifting paths. If powered equipment may be added later, reserve a suitable zone near an existing outlet rather than planning to run a lead across the room.
Test a small garage gym layout before installing anything
A compact garage rewards disciplined equipment selection. Begin by marking the room, vehicle bay and doors with removable tape. Then mark the full operating area of the largest proposed item.
Place the fixed station along a side or rear wall where its height does not conflict with door hardware. Use the adjacent floor for a movable bench and free weights. Keep the central or front section open so it can alternate between vehicle access, floor work and equipment setup.
In a narrow garage, orient the bench and rack so longer movements run with the length of the room. If barbell loading space remains insufficient, a dumbbell-led arrangement may be more practical than forcing a full barbell station into the available width.
A dedicated garage offers more freedom, but it should still preserve a continuous route from the main entrance to household doors and storage. Place the heaviest station first, build the free-weight zone around it and locate accessory storage last.
Build the gym in a deliberate order
A staged setup gives you the opportunity to correct the layout before the room fills.
Stage one: mark the plan
Use tape or flattened cartons to show the stored and operating dimensions of the proposed equipment. Open every door, imitate plate changes and walk through a complete workout sequence.
Stage two: place the fixed equipment
Assemble the rack or main station in its intended zone. Confirm that adjustment points, attachments and storage areas remain accessible before adding other items.
Stage three: add flexible essentials
Introduce the bench, chosen weights and a mat or open-floor setup. Complete several normal sessions before deciding which specialist accessories are genuinely missing.
Stage four: install storage around behaviour
Notice where collars, bands, handles and plates naturally accumulate during training. Put storage close to those locations rather than choosing positions based only on visual symmetry.
Stage five: protect an upgrade zone
Leave one wall section or floor edge deliberately unallocated. That reserve could later accommodate more weight storage, a cable attachment or another item supported by the training program.
Planning unused capacity now is easier than rebuilding the whole garage gym setup after each purchase.
Avoid the layout mistakes that make training harder
One common mistake is placing equipment tightly against walls without checking how adjustments are made. A machine may technically fit but become frustrating if a pin, pulley or plate sleeve cannot be reached.
Another is treating storage as a future problem. Plates, handles and portable weights begin occupying the workout area as soon as they arrive, so every initial purchase needs a defined home.
Do not let rarely used specialty equipment consume the best section of floor. Prioritise items that appear repeatedly in the weekly program and place occasional-use accessories in secondary storage.
Finally, resist fixing shelving or wall storage before testing the workout flow. Complete a full representative session with the equipment extended, the garage door in its normal position and every required household route in use. The points where you instinctively place plates, handles and the bench will show exactly where permanent storage belongs.
Frequently Asked Questions
Can a garage gym still work if I park a car in the same space?
Yes, provided the vehicle footprint and equipment reset process are planned first. Keep heavy stations in a permanent side or rear zone, then use folding or wheeled equipment in the cleared vehicle bay. Mark the parking position, door openings and walking route before buying anything. The setup should be simple enough to restore after each session without shifting a loaded rack or several heavy storage units.
How much ceiling height does a garage power rack need?
The required height depends on the exact rack and any overhead movements or attachments. Measure to the lowest obstruction, including an open garage door, tracks, motors, beams and suspended shelves. Compare that figure with the assembled product height and the space needed to use pull-up bars or cables. Never assume the advertised garage ceiling height represents the unobstructed area available above the proposed station.
What flooring should I use beneath garage gym equipment?
Choose a stable surface that suits the equipment feet, intended movements and existing garage floor. First check that the concrete or current surface is level where the rack and bench will stand. Added flooring should not slide, separate under load or create a raised edge across a walking route. Also account for the flooring thickness when measuring doors, equipment stability and available clearance beneath overhead hardware.
Should a power rack face towards or away from the garage door?
The best orientation is the one that preserves bar loading space, equipment access and a clear route through the garage. Facing the rack towards the opening may improve airflow, but door tracks or moving vehicles can affect the usable zone. Test both orientations with a taped operating footprint. Include the bench, barbell ends, pulley movements and the garage door in its open and closed positions.
How can I reduce moisture problems around garage gym equipment?
Place equipment away from water entry points and areas affected by wet vehicles or wind-driven rain. Maintain airflow around metal frames, weight plates, upholstery and stored mats rather than packing them tightly against damp walls. Wipe equipment after training and follow its care instructions for fasteners, cables and moving parts. Regular checks are particularly useful where seasonal humidity or temperature changes affect the garage.
What equipment should I buy first for a garage gym?
Start with the items required for the exercises you perform most often. A general strength setup might begin with adjustable weights, a suitable bench and open floor space, while regular barbell training may justify a rack earlier. Measure and assign storage before purchasing. Add specialist stations only after several sessions reveal a genuine training gap that cannot be covered by the existing equipment.
 Tags: