1300 760 441
 cs@factoryfast.com.au
Projector Screens Buyer Guide: Size, Aspect Ratio and Manual vs Motorised
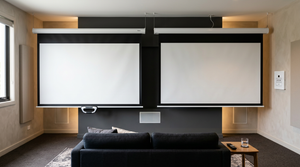

The wrong projector screen can make an otherwise capable home theatre feel awkward. A surface that is too large may dominate the room, the wrong aspect ratio can leave distracting unused areas, and a casing that has not been allowed for may not fit between walls, windows or cabinetry.
The best choice starts with the room rather than the biggest available diagonal. You need to consider usable wall width, seating positions, projector placement, ambient light, content format and how often the screen will be used. Operation also matters: a manual model suits a different buyer from a remotely controlled electric design.
This projector screens buyer guide works through those choices in order. You can compare dedicated projector screens, then consider how the screen will fit with your broader home entertainment equipment.
Start With the Room, Not the Screen Size
A projector screen has to work within the complete viewing area. Measure the available wall or ceiling position before comparing advertised screen sizes.
Measure the usable mounting width
Measure between the nearest permanent obstructions, including side walls, curtains, door openings, shelves and tall furniture. Do not assume the advertised image width is the product’s total width. Retractable models have a casing that extends beyond the viewing surface, while brackets may require further clearance.
For example, Factory Fast’s motorised screen with a 244 × 183 cm viewing area has a 277 cm casing. A buyer who measures only for the image could discover that the housing does not fit the intended wall.
Record three separate measurements:
- the maximum width available for the casing or frame
- the maximum height available when the surface is extended
- the distance from the screen position to the main seating area
Also check whether the screen would cover a television, doorway, wall decoration, light fitting or speaker when lowered. A retractable design can share a wall with other features, but only if the extended fabric has a clear path.
Test the planned image before buying
Use removable tape to mark the proposed viewing area on the wall. Sit in every regular viewing position and look at the full outline, including its top and bottom edges. This simple test can reveal whether viewers would need to turn their heads, look sharply upwards or struggle to see around furniture.
Display some of your usual content on the marked wall if the projector is already available. Test subtitles, menus and small text as well as large moving images. An impressive movie image may still be uncomfortable for presentations, games or programs with detailed on-screen information.
Confirm the projector can fill the area
A screen cannot correct a mismatch between projector placement and image size. Check that the projector can create the planned image from the available throw distance without relying on excessive digital correction. Confirm the lens can align with the screen position and that a ceiling fan, light fitting or high shelf will not interrupt the projected path.
This is particularly important in living rooms where furniture determines projector placement. If the required image does not fit cleanly, reducing the screen size usually produces a better result than forcing the projector beyond a practical position.
Choose an Aspect Ratio That Matches Your Main Content
Aspect ratio describes the relationship between image width and height. Matching the screen format to the content reduces unused surface area and makes better use of the available wall.
When 16:9 is the practical choice
A 16:9 projector screen is a strong option for widescreen home entertainment, games and much contemporary video content. It creates a broad image without requiring the extra vertical space of a more square format.
It is also useful in rooms with limited ceiling height or furniture beneath the screen. The wide shape can deliver a generous image while keeping the lower edge at a more comfortable position.
If most viewing will be widescreen, choose a screen designed around that format rather than buying extra height that will rarely be used. Factory Fast’s manual option has a dedicated 16:9 surface, making its format clear before installation.
When a 4:3-capable surface is useful
A taller 4:3 format may suit presentations, older material or mixed-use rooms where the projected source changes regularly. Some screens support both 4:3 and 16:9 output, but the image will not always occupy the entire surface in each mode.
That flexibility can be valuable in a multipurpose room. However, buyers should distinguish between “supports” and “perfectly fills”. Check the physical proportions of the viewing area as well as the listed compatible formats.
Match all three parts of the system
The cleanest result comes when the content, projector output and screen shape agree. Check the projector’s native aspect ratio and the format used most often. A wide screen does not automatically turn a differently proportioned image into widescreen; changing the output carelessly can crop or distort the picture.
If the room serves several purposes, prioritise the content that matters most and accept that less common formats may use only part of the surface. This is usually a better compromise than choosing an awkward screen shape for occasional material.
Manual vs Motorised Projector Screens
The main operational choice is between a manual retractable screen and a motorised model. Both can keep the viewing surface stored when it is not needed, but they differ in price, convenience and installation planning.
Choose manual for simple, occasional viewing
A manual pull-down design suits buyers who want a straightforward retractable surface without powered operation. It can work well in a rental-friendly entertainment setup, multipurpose room, teaching area or occasional movie space, provided the mounting position is appropriate.
The manual pull-down 16:9 projection screen has a matte white fabric surface, black light-blocking backing, a specified gain of 1.1 and a viewing angle of up to 160 degrees. Its metal casing can be mounted on a suitable wall or ceiling using the built-in bracket.
At the time of research, that model was listed at $104.95. It is the lower-cost example in this comparison and does not require a powered control system. The tradeoff is that someone must physically extend and retract it, so the handle needs to remain easy to reach.
A manual design is generally the better fit when:
- the screen will be used occasionally
- keeping the purchase price lower is important
- the mounting point can be reached comfortably
- remote operation would add little practical value
- a dedicated 16:9 viewing surface matches the main content
Choose motorised for frequent use and easier operation
An electric screen suits a frequently used home theatre, larger room or shared space where smooth remote operation will make a noticeable difference. It can be lowered from the viewing position and stored without pulling directly on the fabric.
The 120-inch motorised projector screen offers a 244 × 183 cm viewing area, precision-matte fabric and a 277 cm white casing. It includes wireless remote operation as well as a wall-mounted control and can be installed on a suitable wall or ceiling. Its product page lists support for both 4:3 and 16:9 formats.
That option was priced at $289.95 when researched. The higher price buys convenient operation, but the casing is substantial and its position needs to be planned before ordering. Buyers must also account for the powered installation requirements of the selected location.
A motorised model is likely to suit when:
- the screen will be lowered regularly
- the casing is mounted beyond comfortable reach
- several people will operate the setup
- a cleaner transition between normal living and viewing modes is valued
- the room can accommodate the full housing length
Understand Surface, Backing and Viewing Angle
Screen material affects how projected light is presented across the room. A purpose-made surface also provides a more consistent base than a wall with visible texture, colour variation or joins.
Matte white surfaces suit broad viewing positions
A matte white finish is a versatile choice for home entertainment and presentation spaces. It is intended to distribute the projected image across a useful viewing area rather than concentrate it into a narrow central position.
This matters when a sofa extends beyond the projector’s centre line or viewers sit in several rows. A listed viewing angle gives a useful comparison point, but room layout still needs to be tested. Furniture, doorways and side walls may limit practical seating before the surface itself does.
Gain should be considered with room light
Screen gain describes the amount and direction of reflected projector light. A surface with a specified gain of 1.1 is designed to provide a modestly reflective result while retaining a broad viewing area.
Do not choose from gain alone. The projector, room darkness, wall colours and seating spread all influence the result. Light coming across the surface can reduce perceived contrast, particularly when it cannot be covered during viewing.
Black backing and borders have different jobs
A black backing helps limit light passing through the fabric from behind. This can be useful when a retractable screen hangs in front of a light-coloured wall, window covering or another reflective surface.
Black edging provides a defined boundary around the projected area. It can make alignment easier because the intended image has a clear visual frame. The projected picture should sit inside that boundary rather than spill onto the casing, wall or unused fabric.
Plan Wall or Ceiling Mounting Before Ordering
Wall and ceiling mounting can both produce a tidy installation, but the room structure and desired screen position should decide between them.
Wall mounting
A wall-mounted casing is often easier to visualise and access. It may suit rooms where the screen hangs directly in front of a clear wall or television. Check whether the casing will interfere with curtains, artwork, doors or speakers.
The screen should lower without touching furniture. Measure the depth of cabinets and entertainment units as well as their height. If the surface brushes an object, it may not hang freely.
Ceiling mounting
Ceiling mounting can position the screen away from the wall and allow it to descend in front of a window, storage unit or existing display. It is useful when the ideal image plane does not align with a suitable wall position.
Before committing, confirm where the extended surface will finish and whether viewers can walk beneath the casing without obstruction. The projector lens also needs to align with the new screen plane rather than the wall behind it.
Set the viewing height from the seats
A high screen can cause discomfort even when it fits the wall. Mark the lower and upper edges, then assess them from the normal seated position. Do not centre the screen automatically between the floor and ceiling; centre it around the viewing experience.
In a room with reclining seating, allow for the changed sightline. In a shared living room, check that coffee tables, lamps and people moving through the space will not block the lower portion of the image.
Compare the Complete Cost, Not Just the Screen Price
The screen price is only one part of the project. The final cost may also be influenced by mounting hardware, access to the installation position, powered operation, cable routing and changes to the projector location.
A manual model can reduce the initial spend and remove the need for motor controls. It may still require careful mounting, especially when a long casing must remain level. An electric option costs more but can provide meaningful convenience when the screen is large, high or used often.
Delivery access also deserves attention because projector screen housings are long items. Check the product’s casing length against entrances, hallways, stairs and lifts before ordering. A screen that fits the wall may still be difficult to move into the room.
Price should therefore be compared against ownership habits:
- How many times will the screen be used in a typical week?
- Who will extend and retract it?
- Can the manual handle be reached easily?
- Is powered operation worth the additional planning?
- Would a smaller model be easier to install without reducing viewing comfort?
Common Projector Screen Buying Mistakes
Buying by diagonal alone
A diagonal measurement does not tell you the full screen width, height or casing length. Compare all available dimensions with the marked installation area.
Ignoring the casing
Retractable housings extend beyond the viewing surface. Measure the complete product, including any clearance needed around mounting points.
Choosing the largest surface the wall can hold
A wall-sized image can be tiring from a short seating distance. Test subtitles and detailed content, not only dramatic movie scenes, before selecting a size.
Treating aspect-ratio support as a perfect fit
A screen may display more than one format without using its full surface in every mode. Confirm its physical shape and your projector’s output.
Forgetting the extended screen path
Check lamps, speakers, cabinets, handles and foot traffic. The fabric needs a clear vertical path whenever it is lowered.
Selecting motorised operation without planning the location
Remote control is convenient, but the casing still needs a suitable mounting position and the powered arrangement must be considered as part of the room plan.
A Practical Projector Screen Decision Sequence
Make the purchase decision in this order:
- Measure the maximum casing width and extended height.
- Mark a proposed viewing area and assess it from every seat.
- Confirm that the projector can produce and align the required image.
- Choose the aspect ratio that matches the main content.
- Decide whether manual or motorised operation suits the frequency of use.
- Compare surface, backing, border and viewing-angle details.
- Select wall or ceiling mounting based on the required image plane.
- Check delivery access and the complete installation requirements.
- Reconfirm the exact product dimensions before ordering.
For more setup context, read the Factory Fast guide to projector screen types, sizes and setup tips.
Before placing the order, mark the full casing length separately from the viewing area and leave both outlines in position for a day. Seeing how the housing relates to curtains, furniture and walking paths during normal room use can expose a fit problem that a single wall measurement will miss.
Frequently Asked Questions
Can I install a projector screen above a television?
Yes, a retractable screen can be installed so it lowers in front of a television, provided the casing fits and the fabric clears the unit. Measure the television’s depth, any wall bracket projection and the screen’s extended path. Also check that the lower edge reaches a comfortable viewing height without touching the cabinet or placing the projected image too high.
Is a projector screen better than projecting onto a wall?
A purpose-made screen provides a consistent surface without the texture, joins or colour variation found on many walls. Matte fabric, defined borders and light-blocking backing can also support cleaner image presentation. A wall may be adequate for temporary testing, but a dedicated projection surface makes sizing and alignment more predictable in a regularly used home theatre.
Will a projector screen work in a bright living room?
It will display an image, but uncontrolled room light can reduce perceived contrast and make darker content harder to see. Consider where windows and lamps sit relative to the surface, then test the room at the times viewing normally occurs. Curtains or blinds may be more valuable than simply choosing a larger screen, because additional size does not remove ambient light.
How should I clean a retractable projector screen?
Start with the care directions supplied for the specific screen. Remove loose dust gently and avoid harsh chemicals, abrasive tools or soaking the surface. Keep the fabric supported and do not scrub one area aggressively, as uneven pressure may affect its appearance. Allow any permitted light cleaning to dry fully before retracting the screen into its casing.
Is a motorised projector screen worth the higher price?
A motorised model is most worthwhile when the screen is used frequently, mounted high or shared by several users. Remote and wall controls remove the need to reach and pull the surface manually. For occasional viewing in an accessible position, a manual screen may deliver the required function at a lower price and with fewer powered components to plan around.
Can a retractable projector screen be used outdoors?
Some retractable screens may be used for temporary outdoor viewing when the individual product information supports that use and conditions are suitable. The surface should be protected from wind, moisture, dirt and rough handling. Do not assume an indoor wall or ceiling model can remain outside permanently; confirm the listed use case and arrange a stable mounting position before setup.
 Tags: