1300 760 441
 cs@factoryfast.com.au
Undermount vs Topmount Kitchen Sinks: Which Installation Suits Your Benchtop?
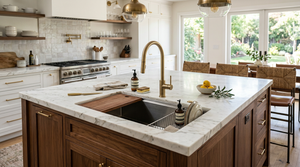

A kitchen sink can look perfectly suited to a renovation until its mounting method meets the benchtop. That is where practical differences between undermount and topmount kitchen sinks become important. The choice affects the cut-out, exposed edges, cleaning routine, cabinet space and how easily the sink may be replaced later.
Neither mounting style is automatically better. An undermount sink can create a clean transition from benchtop to bowl, while a topmount sink offers broad benchtop compatibility and a more forgiving installation arrangement. The right answer depends on the surface surrounding the sink, the way the kitchen is used and the level of precision available during installation.
Before comparing finishes or accessories, browse the available kitchen sinks for Australian homes and note which models support one or both mounting methods. A sink designed for flexible installation can let the benchtop decision lead the project rather than limiting the available bowl shapes.
The quick difference between undermount and topmount sinks
An undermount kitchen sink is fixed beneath the benchtop. The cut edge of the work surface remains visible around the bowl, with no sink rim sitting on top. This creates a continuous-looking surface and allows crumbs or water to be wiped directly towards the basin.
A topmount kitchen sink is lowered into a prepared opening from above. Its outer rim rests on the benchtop and covers the edge of the cut-out. It is also commonly described as a drop-in or inset sink.
The most important distinction is therefore not the bowl itself. It is the relationship between the sink rim, the benchtop and the cut edge. That relationship determines which materials are suitable, how exact the opening needs to be and where the sealed joint sits.
Choose an undermount installation when a clean benchtop line and wipe-in cleaning are priorities, provided the surface can accommodate the exposed cut-out and the sink can be supported correctly. Choose a topmount arrangement when material compatibility, replacement flexibility or a covered cut edge carries more weight.
How each kitchen sink mounting method works
Understanding what physically holds the sink in place makes the comparison much clearer. The mounting choice changes the role of the benchtop and the type of preparation required around the opening.
How an undermount sink is positioned
With an undermount installation, the sink sits below the benchtop and is secured from underneath. The opening becomes part of the finished appearance, so its shape, alignment and edge quality matter. The join between bowl and work surface also needs to remain accessible enough for suitable sealing and maintenance.
The reveal describes how the benchtop edge relates to the bowl opening. Depending on the selected sink and project detail, the edge may align with the bowl, extend slightly over it or leave a small section of the sink rim visible. This should be decided before the opening is made because it affects both appearance and everyday cleaning.
The weight of the basin, water and dishes cannot be treated as something the seal alone should manage. Support and fixing details should be confirmed for the exact sink, cabinet and work surface before installation begins.
How a topmount sink is positioned
A topmount model passes through the benchtop opening from above. The rim overlaps the perimeter, hides the cut edge and transfers part of the load across the surrounding surface. Compatible clips or brackets generally secure the unit beneath the bench.
Because the rim conceals the opening, the visible cut does not need to form the same precise decorative edge required by an undermount design. The cut-out must still match the product template and leave enough material for secure fitting.
The raised perimeter creates a defined boundary around the basin. Some shoppers prefer that framed appearance, while others prioritise an uninterrupted work surface. The practical trade-off is that the edge can catch crumbs or moisture and therefore needs deliberate wiping.
Start with your benchtop material
Benchtop compatibility is the first branch in the decision tree because it can rule out an otherwise attractive mounting style. Decide this before becoming attached to a particular sink profile.
Laminate and surfaces with a layered core
A topmount kitchen sink is generally the more straightforward choice for laminate because its rim covers the cut edge. This separates the exposed core from the visual finish and makes the perimeter less demanding than a fully visible opening.
An undermount arrangement leaves the benchtop edge on display. If the internal structure is not intended to be exposed and finished, the result may be difficult to detail or maintain. Do not assume a photograph of an undermount basin means the same installation is appropriate for every work surface.
For an existing laminate bench, a drop-in sink can also be useful when the new model must cover a previous cut-out. Measure both the overall rim and the required opening. A bowl may fit inside the cabinet but still fail to conceal the existing hole.
Stone and other solid benchtops
Solid work surfaces can make an undermount sink possible because the opening can become a finished part of the benchtop. The smooth transition is particularly useful when the household wants to wipe food preparation debris directly into the basin.
These surfaces can also accept topmount models, so the material does not force an undermount decision. A visible rim may still be preferable when the project prioritises simpler future replacement, a traditional sink outline or a model with an integrated drainer.
Confirm the proposed cut-out, edge treatment and support method with the person preparing the benchtop. The sink’s external dimensions are not a substitute for its cut-out template.
Existing timber or customised work surfaces
Custom benchtops require a project-specific assessment. Consider how the exposed edge will be finished, how moisture will be managed and whether the surface can carry the intended fixing arrangement. A top-mounted rim can cover the opening, but it does not remove the need for accurate sealing.
When working with an existing surface, inspect its condition around the old sink before ordering. Swelling, movement or an irregular cut-out can change what will fit successfully. It may be more practical to select a larger compatible rim than to force a visually minimal installation into a compromised opening.
Cleaning and day-to-day ownership
The cleaning difference is real, but it is more nuanced than saying one sink is easy and the other is difficult. Each mounting method moves the area requiring attention.
An undermount sink removes the raised lip from the top of the benchtop. Crumbs and small spills can be directed into the bowl without being lifted over a rim. This suits active preparation zones where the surrounding bench is wiped repeatedly throughout the day.
Attention instead shifts to the underside joint where the basin meets the benchtop. That area should be kept free of residue and monitored as part of normal kitchen care. Deep bowls can also place the base farther from reach, regardless of how the sink is mounted.
A topmount design keeps the main joint visible from above. Its rim is easy to see during cleaning, but debris can gather along the perimeter if wiping stops at the edge. A soft cloth or brush can address the narrow transition without relying on abrasive treatment.
Corner shape matters alongside mounting style. Tight internal corners create a sharper contemporary appearance but require more focused cleaning than generous rounded corners. Compare the bowl geometry as carefully as the rim because both affect the ownership routine.
Stainless steel surfaces benefit from prompt rinsing and drying after messy tasks. Wipe in the direction of the finish and avoid leaving damp cloths trapped against the perimeter. These habits apply whether the bowl sits above or below the benchtop.
Installation complexity and renovation timing
Topmount sinks are often attractive for replacement projects because they are inserted from above and the rim hides the opening. That does not make every replacement automatic. Plumbing position, cabinet width, clip access and cut-out size must still align with the new model.
An undermount installation normally requires earlier coordination. The sink, reveal and tap layout need to be settled before the benchtop opening is completed. Changing the basin after the surface has been prepared can be difficult if the new rim or corner radius differs.
Ask these questions before installation:
- Is the benchtop material suitable for the selected mounting method?
- Does the manufacturer provide the correct cut-out template?
- Can the cabinet accommodate the full bowl depth and mounting hardware?
- Is there clear access for the waste, tap connections and clips?
- What supports the filled sink beneath the benchtop?
- Will drawers, shelves or nearby appliances interfere with the bowl?
- Does the chosen tap require a separate hole in the bench or sink deck?
The sink should be considered with the wider kitchen fixtures and fittings, not as an isolated purchase. A deep bowl, waste position or pull-out tap connection can occupy space that cabinetry plans have allocated elsewhere.
Installation sequence also affects inconvenience. In a new kitchen, the sink can be coordinated with the cabinet and benchtop from the beginning. During a partial update, the existing opening and plumbing may have more influence than the preferred appearance.
Bowl size matters more than the visible rim
Shoppers often focus on whether the sink sits above or below the bench, yet bowl dimensions usually have the greater effect on washing, preparation and cabinet storage. Compare external size, internal bowl measurements and depth separately.
A large single bowl provides uninterrupted space for trays, stockpots and wide cookware. A divided model allows washing and rinsing to happen independently, but each compartment is smaller. Bowl choice should follow the household’s routine before the mounting method is finalised.
For example, the live 810 x 505 mm single-bowl stainless steel sink can be installed either way. Its bowl measures 760 x 455 x 225 mm, while the stainless steel is listed at 1.5 mm thick. It includes a square strainer waste, grid, clips, cut-out template and sound padding. This type of open basin suits buyers who need room for large items and want the benchtop to determine the final mounting treatment.
The 715 x 440 mm double-bowl stainless steel sink offers a different workflow. Its larger compartment measures 450 x 400 x 205 mm and the smaller one measures 200 x 400 x 205 mm. The 1.2 mm construction, two included wastes and dual-installation design suit kitchens where separating tasks matters more than keeping one broad washing area.
Those examples demonstrate why “undermount versus topmount” should not become the only decision. Two sinks can support both installations while delivering completely different day-to-day experiences.
Check bowl depth against the waste assembly and usable cabinet height. A 225 mm-deep bowl extends farther into the cupboard than its top dimensions suggest. Allow for plumbing, stored items and any internal drawers before confirming the order.
Buyers still comparing bowl shapes, materials and configurations can use the broader guide to choosing a kitchen sink style before narrowing the decision to installation.
Which mounting style suits different kitchen projects?
The best choice becomes clearer when it is connected to a real renovation scenario rather than considered only as a design preference.
Choose an undermount sink when
An undermount installation is a strong candidate when the project uses a suitable solid benchtop, a streamlined preparation surface is important and the opening can be professionally coordinated before fabrication.
It also suits cooks who frequently wipe crumbs or chopped ingredients from the bench into the basin. The absence of a raised rim makes that movement direct, especially when the sink sits close to the main preparation zone.
This option is less convincing when the surface has an unsuitable exposed core, the existing cut-out cannot be refined easily or future sink replacement is a major priority. The edge profile and bowl outline become closely tied to the completed work surface.
Choose a topmount sink when
A topmount basin is often practical for laminate benches, existing kitchens and renovations where the rim needs to conceal the cut-out. It can also suit shoppers who like a clearly framed sink or want a model with a deck or integrated drainer.
The installation can be more forgiving visually, but the product still needs the correct cut-out and secure fitting. Check the rim width carefully during replacement work because it must cover the opening without colliding with a wall, splashback or tap hole.
This approach may be less appealing when the household strongly prioritises a continuous-looking benchtop or wants to wipe debris into the bowl without meeting an edge.
Common mistakes when comparing undermount and topmount sinks
The first mistake is selecting the mounting style before checking the benchtop. A preferred look cannot compensate for a surface that is difficult to finish around an exposed opening.
The second is measuring only the old sink rim. Replacement planning should record the existing cut-out, the overall dimensions of the new model and the space inside the cabinet. A sink can appear similar from above while using a different corner radius or clip position underneath.
Another mistake is confusing external size with usable capacity. Two models with comparable footprints may have different bowl widths, depths, dividers or drain locations. Base the comparison on the cookware and kitchen tasks the basin must accommodate.
Some renovators also overlook the tap position. A sink without a tap deck usually requires the mixer to pass through the benchtop. Confirm there is enough material behind the opening and sufficient clearance below for connections.
Ignoring accessories can reduce the usefulness of an otherwise suitable purchase. A grid, waste, clips or template may be included with one model but not another. Review the exact product contents instead of assuming installation components are universal.
Finally, do not order from nominal dimensions alone. Obtain the model-specific measurements and template before altering cabinetry or cutting the bench. Product names are useful for filtering options, but the installation drawing should guide the project.
A five-question way to make the final decision
First, what is the benchtop made from? If it has a layered core that should not remain exposed, start with topmount-compatible options. If it is a suitable solid surface, keep both methods under consideration.
Second, how do you clean and prepare food? Frequent wipe-in cleaning favours an uninterrupted edge. Buyers who do not mind cleaning around a visible rim may place more value on installation flexibility.
Third, is this a new benchtop or a replacement? New work can be planned around an undermount opening. An existing cut-out may make the coverage offered by a drop-in rim more useful.
Fourth, what bowl arrangement fits the household? Choose between broad single-bowl capacity and divided tasks before becoming fixed on the installation appearance.
Fifth, have all hidden clearances been checked? Confirm cabinet width, bowl depth, waste position, tap connections and access for mounting hardware. A sink that fits the benchtop but blocks a drawer or crowds the plumbing is not the right fit.
Make the benchtop and bowl work as one system
The mounting decision should end with a marked-up plan, not a colour choice. Record the smallest usable cabinet width, the actual benchtop cut-out, the chosen reveal, the tap-hole position and the space needed beneath the waste. Then compare those details with the exact sink template.
Before the opening is cut, place the tap, bowl and nearby cabinet divisions on the same drawing. That one check can reveal whether a clean-looking undermount installation leaves too little room behind the mixer, or whether a topmount rim will collide with the splashback. It is a small planning step that can determine whether the finished sink works as well as it looks.
Frequently Asked Questions
-
 Tags:
Kitchen Sinks
Tags:
Kitchen Sinks