1300 760 441
 cs@factoryfast.com.au
Barn Door Hardware: Style Choices and Installation Tips for Australian Homes
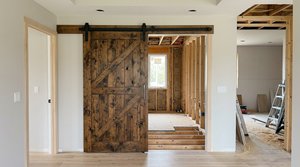

A barn door can solve a floor-space problem, but the visible hardware often determines whether the finished doorway looks deliberately designed or improvised. The track must suit the opening, the rollers must support the door, and the wall needs enough uninterrupted space for the panel to slide fully clear.
That makes choosing barn door hardware a practical fitting decision before it becomes a style decision. Start with the door material, dimensions and weight, then assess the wall and opening. Once those details work together, finishes such as black or brushed stainless steel can be compared with confidence.
Start With the Door, Not the Hardware Finish
The door panel controls most of the important compatibility decisions. Before comparing roller shapes or colours, record the door’s width, height, thickness, material and actual weight.
A hardware kit’s stated capacity is only one part of the fit. The hangers, fasteners and floor guide must also be suitable for the door construction, while the track must provide enough travel for the panel to uncover the doorway.
Timber doors need compatible hangers and panel thickness
Solid, engineered and framed timber doors may look similar from the front but can differ considerably in weight and fixing strength. Check that the chosen installation points provide enough material for the hanger fasteners rather than assuming any section of the panel can carry the load.
The heavy-duty 1.8 m sliding barn door hardware kit is a useful timber-door example. Its specifications list compatibility with doors from 35 mm to 45 mm thick and a stated capacity of 160 kg. The black metal kit includes J-shaped hangers, rollers, anti-jump discs, stops, end caps and a T-shaped floor guide. The door is purchased separately.
Glass doors require purpose-matched components
Do not treat hardware intended for timber as automatically suitable for glass. Glass systems use different attachment methods and require the panel thickness to match the fittings precisely. Holes and cut-outs generally need to be resolved before the finished panel reaches the installation site.
For comparison, the brushed stainless steel sliding door hardware kit is specified for glass panels measuring 8 mm to 10 mm thick. It uses a 2 m rail for doors and openings up to 1 m wide, with a stated capacity of 100 kg. The package also includes a handle, floor guide, stops and installation accessories.
Match Track Length to the Opening and Wall Run
Track length affects how far the door can travel. A track that is too short may leave part of the doorway covered even when the panel is fully open. A longer rail will not solve the problem if furniture, a corner, a light switch or an adjoining doorway blocks the door’s path.
Measure the finished opening
Measure the width and height of the completed doorway, including any architrave that projects into the door path. The panel should provide enough overlap to cover the opening when closed, but its width must still suit the selected kit.
The 2 m black sliding barn door hardware system uses two 1 m rails joined together. It is listed for doors and openings up to 1 m wide, with a stated door capacity of 150 kg. The kit includes rollers, stops, anti-jump blocks, six track clamps and a floor guide.
That product-specific limit is more useful than choosing a rail from appearance alone. Check the maximum opening width stated on the exact product page rather than assuming that every 2 m track accommodates the same door.
Check the complete sliding path
Measure the clear wall area from the edge of the opening to the point where the door will stop. Include the door handle in this check because a projecting pull can contact nearby furniture or prevent the panel from moving as far as expected.
Also inspect skirting boards and thick architraves. These can hold the lower part of the door away from the wall, changing the position required for the track spacers and floor guide. If the doorway sits close to a perpendicular wall, confirm that the handle remains reachable when the door is fully open.
Choose a Finish That Belongs in the Room
The rail and rollers sit above eye level and span much of the wall, so their finish has more visual weight than a standard hinged-door handle. Look beyond the door itself and consider nearby lighting, cabinetry, tapware and other door hardware.
Black hardware creates a defined outline
Black barn door hardware works well when the track is intended to become part of the room’s design. It can create clear contrast against pale walls or continue the lines of black window frames, shelving and furniture.
The finish does not require a rustic setting. Simple black rails can also suit contemporary interiors, particularly when paired with a plain timber panel or a door painted to match the wall. More decorative hanger shapes place greater emphasis on the hardware and should be chosen only when that detail supports the rest of the room.
Brushed stainless steel has a lighter visual effect
Brushed stainless steel suits spaces where black hardware would feel too dominant. Its softer contrast can coordinate with silver-toned fixtures and works particularly well with glass, light timber and restrained contemporary finishes.
Finish consistency matters most within the same sightline. The track, hangers, stops and handle do not have to match every fitting in the home, but they should make sense beside the hardware visible from that doorway.
Check What the Barn Door Kit Includes
A complete sliding door setup needs more than a rail and two rollers. Compare package contents carefully because doors, handles and installation fasteners may be sold separately.
Rollers, stops and anti-jump components
Rollers carry the door along the track. Stops define the fully open and closed positions, while anti-jump components help keep the rollers correctly located during movement. Confirm that the supplied stops can be positioned where your door needs to finish rather than where the room layout merely allows the rail to end.
Two-piece tracks can be easier to transport and position, but their connector must be assembled accurately so the rollers can pass over the join smoothly. A single uninterrupted rail removes that junction but may be less convenient to move through tight access areas.
Floor guides control lower-door movement
The floor guide keeps the bottom of the panel aligned instead of allowing it to swing towards and away from the wall. Its position must follow the door through the full travel range, including when the panel is almost completely open or closed.
Check the guide design against the bottom edge of the door. Some arrangements require a compatible groove, while others guide the panel externally. Resolve this detail before finishing or painting the door so that any required preparation can be completed cleanly.
Handles need grip and wall clearance
A barn door normally needs a projecting pull on the exposed face and a low-profile or flush solution on the wall-facing side. A conventional projecting handle on both sides may strike the wall or architrave before the door opens fully.
The 300 mm rounded stainless steel pull-handle pair is designed for back-to-back fitting across compatible materials. Its product page lists suitability for wood panels from 35 mm to 45 mm thick. Browse the wider door handle collection only after confirming the fixing centres, panel thickness and available wall-side clearance.
Plan the Installation in the Right Order
Barn door installation is easiest to manage when the room, wall and door are checked before any drilling begins. The following sequence exposes compatibility problems while changes are still possible.
Confirm the fixing surface
Identify where the rail will attach and whether the structure behind the finished wall can support the full moving assembly. The weight capacity printed on a kit does not prove that the wall itself is suitable.
Account for the weight of the door, not simply its dimensions. If the fixing structure is uncertain, have it assessed before installation rather than relying on surface materials alone.
Establish the track height and door clearance
Use the product instructions and actual hanger dimensions to calculate the rail height. Allow for the finished floor, the required lower clearance and the position of the floor guide. Check that the top of the door will not contact the rail and that the bottom will clear floor transitions throughout its travel.
Mark the intended door position when fully closed. This makes it easier to confirm the required overlap and prevents the handle or leading edge from ending in an awkward position.
Install, align and test before final tightening
Mount the rail level according to the supplied instructions, fit the hangers to the compatible parts of the door, then place the rollers onto the track. Position the stops only after confirming the usable opening and handle clearance.
Move the panel slowly through its complete path. Check the rail join where applicable, confirm that the lower guide keeps the door aligned and verify that the stops catch the door before another fitting or wall surface does. Complete the final tightening only after the movement and end positions are correct.
Avoid the Mistakes That Cause Poor Results
Choosing by finish before checking compatibility is the most common planning error. Black hardware will not rescue a track that is too short, and a high stated weight capacity does not compensate for the wrong door thickness.
Other costly mistakes include overlooking wall switches, measuring the opening before the architrave is fitted, assuming the door is included with the kit, and forgetting that the panel needs somewhere to travel. Handle projection, skirting depth and floor-guide compatibility are small details that can materially change the result.
Before ordering, photograph the empty doorway and use removable tape to mark the full rail length, closed door edge and open door edge on the wall. Add the handle position to the same full-size outline. That five-minute mock-up can reveal a blocked switch, cramped grip point or insufficient wall run before any hardware is unpacked.
Frequently Asked Questions
How long should a barn door track be?
The correct track length depends on the door width, opening width and how far the panel must move to clear the doorway. Use the maximum door and opening dimensions stated for the exact kit rather than relying on a general ratio. You also need at least the required wall-side run, free from furniture, switches, corners and other doors.
Can barn door hardware be fitted to any wall?
No. The fixing location must be capable of supporting the track, door and forces created as the panel moves and stops. Wall linings alone may not provide an appropriate mounting point. Check the structure behind the finished surface before drilling, and obtain installation assistance when the wall construction or fixing position is uncertain.
Does a sliding barn door need a floor guide?
Yes, the floor guide is an important part of most barn door installations. It limits movement at the bottom of the panel so the door follows a controlled path rather than swinging towards or away from the wall. Check whether the supplied guide requires a groove beneath the door or is designed to sit around its lower edge.
Can barn door hardware be installed over existing architrave?
It may be possible, but the architrave depth changes the spacing between the door and wall. The track spacers, handle clearance and floor-guide position must all accommodate that projection. Measure from the furthest projecting surface and follow the kit instructions. Removing or altering trim should be decided before the rail height and fixing locations are marked.
Do sliding barn doors provide the same privacy as hinged doors?
A wall-mounted sliding panel usually sits in front of an opening rather than sealing inside a frame, so small perimeter gaps may remain. It can suit wardrobes, studies and room dividers, but buyers seeking stronger light or sound separation should assess the overlap and edge gaps carefully. The door’s intended room matters as much as its appearance.
Can I reuse an existing hinged door as a barn door?
Sometimes, provided the panel has suitable dimensions, thickness, weight and construction for the chosen hardware. Check whether previous hinge or latch cut-outs will remain visible and whether the hanger fixings can attach to sound material. The door must also be wide enough to overlap the opening and move along the available wall without obstruction.
-
 Tags:
Barn Door Hardware