1300 760 441
 cs@factoryfast.com.au
Peel and Stick Wall Tiles Guide: How to Choose, Measure and Install
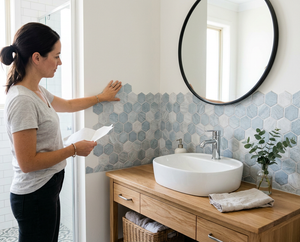

Peel and stick wall tiles can change the character of a kitchen splashback, bathroom vanity wall, island face or small feature area without the work involved in laying ceramic tiles. The apparent simplicity is also where poor purchases begin: a pattern is chosen before the wall is checked, pack quantities are estimated from room size, or the first sheet is fixed without planning the final edge.
A better project starts with the surface, the exact area and the visual result you want. This guide walks through those choices in order, helping you decide whether peel and stick wall tiles suit the job, compare sheet formats and prepare a layout that looks intentional.
Start With the Wall, Not the Pattern
The first decision is not white, dark, hexagonal or fish scale. It is whether the intended surface gives a self-adhesive sheet a suitable base.
Decide whether the location is suitable
Factory Fast's moulded-plastic designs are intended for walls and are described for uses such as kitchen splashbacks, bathroom sink areas, kitchen islands, accent walls and caravans. They are not suitable for use inside a shower and should not be treated as floor tiles. That distinction matters: resistance to normal household humidity does not turn a decorative wall covering into a surface for continuous direct water exposure or foot traffic.
Map the boundaries of the project before measuring. Note sinks, power points, cabinets, windows, trims and any point at which the pattern must stop. A compact splashback with straight cabinet edges is usually a more manageable first project than a full wall with several penetrations and exposed corners.
Check what is already on the wall
The current range is described as suitable over smooth glass, smooth ceramic tiles, acrylic or linoleum wall panelling, mirrors and wallpaper. The same product information says it does not work well on unpainted plywood, unfinished walls, stucco or stone. The practical dividing line is a surface that is smooth, stable, clean and dry enough for the adhesive backing to make consistent contact.
Do not assume that every painted or previously tiled wall is automatically ready. Look for loose material, raised joins, deep texture, grease, dust and moisture. If the substrate is uncertain, a small trial in an inconspicuous position can reveal adhesion or removal issues before the whole pack is committed.
Choose a Pattern That Works at the Edges
Pattern selection affects more than style. It changes how obvious the joins, cuts and final row will be.
Use geometric designs for ordered layouts
Hexagons and herringbone create strong directional lines. They suit a project where you can establish a level starting point and keep the pattern aligned across several sheets. White designs can blend into light cabinetry and make small wall areas feel less visually dense. A black hexagonal finish creates a sharper focal point and makes every boundary more noticeable, so exposed edges deserve extra planning.
Before buying, sketch the wall as a rectangle and mark the centreline. Consider whether the design should be centred on the wall, centred on a sink or aligned with a cabinet. These are not always the same point. A layout tied to the dominant fixture usually looks more deliberate than one based only on the wall's overall width.
Use curved or mosaic designs to soften hard lines
A fish scale motif introduces curves into rooms dominated by square cabinets and straight benchtops. Its repeated arcs can create more movement than a simple grid, but the upper and side edges need thought. Decide which direction the scales will face and keep that orientation consistent from the first sheet onward.
For a small accent area, a visually active pattern can do most of the decorative work. On a larger wall, consider how it will interact with cabinet handles, lighting, artwork and nearby finishes. The tile should establish a focal surface, not compete with every other feature in the room.
Measure the Area and Convert It Into Packs
Buying by eye is risky because a wall's width and height are only the beginning. Sheet dimensions, cuts and pattern alignment all affect the final quantity.
Break the project into simple rectangles
Measure the width and height of each separate section in metres, then multiply width by height to calculate square metres. If an L-shaped area surrounds a window or cabinet, divide it into smaller rectangles and add their areas. Record the dimensions rather than relying on a single total, because those measurements will also guide the installation layout.
The collection describes many sheets as approximately 30 x 30 cm and supplied in packs of 10, with roughly 0.9 m² of nominal coverage per pack. Individual products vary slightly. Ten sheets measuring 305 x 305 mm provide about 0.93 m² before cuts, while ten 295 x 295 mm sheets provide about 0.87 m². Always calculate from the dimensions on the exact product page.
Allow for cuts and pattern alignment
Nominal coverage assumes every part of every sheet is usable. Real projects have offcuts around corners, fixtures and boundary rows. Factory Fast's collection guidance recommends adding 10% for cutting and pattern matching. A plain rectangular splashback may use material efficiently, while a wall with several outlets or a directional motif can produce more unusable pieces.
Round the result up to full packs, not down to the nearest calculated area. Buying too little can interrupt the layout at the most visible point. When comparing options, also check whether the chosen motif gives you useful offcuts that can continue the pattern elsewhere on the wall.
Compare Product Specifications Before You Buy
Products that look similar in a collection can have different sheet sizes, prices and pattern scales. Compare the listing details rather than assuming every pack covers the same area.
Fish scale mosaic for a curved feature
The fish scale mosaic peel and stick tiles use 2 mm moulded-plastic sheets measuring 305 x 305 mm. The pack contains 10 self-adhesive sheets and was listed at $54.95 when checked. The product is described as humidity- and heat-resistant, easy to wipe with a damp sponge and unsuitable for in-shower installation.
This format suits a vanity wall, compact splashback or island face where the curved repeat can act as the main decorative element. Its 305 mm sheet size also provides slightly more nominal pack coverage than a 295 mm square sheet, although the useful coverage still depends on cutting.
Black hexagonal for a defined focal area
The black hexagonal peel and stick tiles are also 2 mm moulded plastic and come as 10 self-adhesive sheets. Each sheet measures 295 x 295 mm, and the pack was listed at $49.95 when checked. The high-contrast finish is best treated as a deliberate focal surface rather than a neutral background.
Use the sheet dimensions to check how many joins will cross the visible area. On a narrow panel, a smaller sheet might fit the available width more efficiently; on a broad wall, it may create additional join lines. Product choice should follow the geometry of the project as well as the preferred colour.
Plan the Layout Before Removing Any Backing
The first fixed sheet controls the alignment of everything that follows. A few minutes spent on a dry layout can prevent a gradually drifting pattern.
Choose the visual starting point
Set out several sheets with the backing still attached and identify how the printed or moulded repeat crosses each join. Mark a level horizontal or vertical reference line appropriate to the pattern. Starting at the most visible focal point can produce balanced edges; starting in a hidden corner may be easier but can leave an awkward narrow strip where the eye lands.
Check the likely final row before the first sheet is applied. If the layout would finish with a very thin sliver, shift the start so the cuts at opposite edges are more balanced. Around a sink or appliance, confirm that the pattern remains level across both sides rather than restarting independently.
Plan cuts in installation order
The product pages specify that the moulded sheets can be cut using a cutter or scissors with a ruler. Measure each obstacle from the last confirmed reference edge, transfer the dimensions carefully and check the orientation before cutting. For repeating motifs, label offcuts so that useful pieces do not become mixed up or rotated.
Dry-fit difficult shapes first. Corners, outlets and the meeting point under cabinets are the areas most likely to expose a rushed measurement. Keeping the protective backing in place until the fit is confirmed reduces wasted sheets.
Prepare and Apply the Self-Adhesive Sheets
Good adhesion depends on contact across the whole backing, so preparation is part of the installation rather than an optional clean-up step.
Create a clean, dry base
Remove surface dust, grease and loose material, then allow the wall to dry completely. Pay particular attention to cooking residue around a splashback and cosmetic or soap residue around a vanity. A sheet cannot compensate for a weak layer underneath it.
If you are covering existing smooth tiles, inspect the entire area rather than checking one convenient section. Raised edges, damaged sections or pronounced variation can interrupt contact. Where the existing surface falls outside the compatibility described on the product page, choose a different wall treatment instead of relying on the adhesive to bridge the problem.
Work from the reference line
Apply one sheet at a time in the planned direction. Keep its edge aligned with the reference line and the adjacent pattern before pressing the full surface into place. Check alignment after every sheet; a small error repeated across a row becomes much more visible at the far edge.
Use the same method around cut-outs: confirm the fit, expose the backing only when ready and press the sheet onto the prepared surface. Avoid improvising a new pattern direction to use an offcut. A saved piece only reduces waste when its orientation and edge continue the design correctly.
Decide Whether Stick On Wall Tiles Are the Right Finish
Self-adhesive tiles are most compelling when the project calls for a fast decorative wall update, the substrate is compatible and the location stays outside direct shower exposure. They can provide a three-dimensional ceramic look with simple cutting tools and no separate tile adhesive.
They are a weaker choice for unfinished, highly textured or porous surfaces, floors and in-shower walls. They may also be less suitable where the design depends on complex external corners or several tiny cuts. In those situations, the convenience of the sheet format can be outweighed by the amount of edge work required.
The key trade-off is flexibility versus permanence. These products can be removed by applying heat and gently prying them away, according to the current product information, but the condition of the wall and any remaining adhesive still depend on the underlying finish. Renters should confirm what their agreement permits and test the intended surface before covering a large area.
Avoid the Mistakes That Make a DIY Finish Look Temporary
Do not mix floor and wall products
Wall sheets are not designed for foot traffic. If the project includes both a vertical surface and the floor below it, select each product for its stated application instead of extending one material across both.
Do not calculate from the advertised nominal size alone
The difference between a 305 mm and 295 mm sheet is small in the hand but meaningful across a full pack. Use the exact dimensions and include cutting allowance before ordering.
Do not hide a surface problem under a decorative layer
Loose wallpaper, unfinished material and uneven texture remain weak points after covering. Resolve the substrate first or use another treatment from the broader wall art and decor range.
Do not leave the stopping point until last
An exposed edge can dominate the result. Decide whether the tile will finish under a cabinet, against a trim, at an internal corner or on a clearly marked vertical line. Make that endpoint part of the layout, not a consequence of where the final sheet happens to land.
Finish the Room Without Crowding the New Surface
A tiled feature area changes the visual weight of a room. After installation, reassess nearby wall pieces rather than automatically returning everything to its previous position. The wider decor and lighting collection can help coordinate mirrors, clocks or lighting, but the wall will usually look stronger when one element leads and the others support it.
Before ordering, mark the proposed tile boundary with removable tape and view it from the room's main entrance. That simple preview reveals whether the feature should stop at a cabinet edge, extend to the next corner or be reduced to a smaller panel. It is the last planning check that can still change the project without wasting a sheet.
Frequently Asked Questions
Are peel and stick wall tiles suitable for bathrooms?
They can suit bathroom vanity walls and other dry, smooth areas, but the current Factory Fast moulded-plastic designs are not intended for installation inside showers. Check the exact location for regular direct water exposure before buying. Clean and dry the substrate thoroughly, and use the product only on a compatible wall surface rather than assuming that humidity resistance makes every bathroom position appropriate.
Can self-adhesive wall tiles go over existing ceramic tiles?
The current product information lists smooth ceramic tiles as a compatible base. The existing surface still needs to be stable, clean and dry so the backing can make consistent contact. Inspect edges and changes in level across the whole project area, then test a discreet section if you are uncertain. Deep or uneven joints may prevent the finished surface from sitting as neatly as planned.
How many packs of stick on wall tiles do I need?
Measure each section in metres and multiply width by height to find its area, then add the sections together. Compare that result with the exact sheet dimensions and pack quantity on the product page. Ten 305 x 305 mm sheets provide about 0.93 m² before cutting. Add the recommended 10% allowance for cuts and pattern matching, then round up to complete packs.
Can peel and stick tiles be removed later?
Factory Fast's current product guidance says the moulded sheets can be warmed with a hairdryer and gently pried away. Removal results can vary with the substrate and its condition, and adhesive residue may remain. Test a small area first, especially on wallpaper or a rented home's painted finish, and confirm that any change to the wall is permitted before beginning a large installation.
Can wall tile stickers be used on floors?
No. Decorative stick on wall tiles are not designed for foot traffic and should not be used as flooring. Choose a product specifically intended for floor installation when the project is underfoot. Keeping the applications properly separated helps the wall covering perform as intended and prevents a visually coordinated project from depending on a material used outside its stated purpose.
How should 3D peel and stick wall tiles be cleaned?
The featured moulded-plastic designs are described as easy to clean with a damp sponge. Wipe the surface gently and pay attention to the raised pattern, where residue may collect along edges. Avoid treating the wall as though it were an in-shower lining, even when it is in a bathroom. Routine light cleaning is better suited to the material and helps preserve the appearance of the joins.
 Tags: