1300 760 441
 cs@factoryfast.com.au
Shower Screen Buying Mistakes to Avoid Before You Order
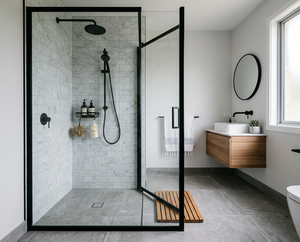

A shower screen can look perfect online and still be wrong for the bathroom. The expensive mistakes usually happen before installation: the opening is measured too early, the door collides with a vanity, a fixed panel is too short for the direction of the spray, or the selected hardware does not match the glass and fixing surfaces.
Avoiding those problems requires more than choosing a width and finish. Start with the room geometry, move through access and water control, and check every included component before placing the order. Use the full shower screen range to compare configurations only after you know what the space must accommodate.
Mistake 1: Choosing the Look Before the Layout
Black, chrome, white, gunmetal and gold hardware can change the character of a bathroom, but finish should be one of the last decisions. The screen's operating format has a much larger effect on everyday use.
Fixed panels suit open entries
A fixed panel has no moving door, which keeps the design visually simple and reduces the number of moving parts to maintain. It works best when the shower area has enough depth to control spray while leaving a practical open entry. A panel that is attractive but too short for the outlet position can leave the bathroom floor exposed to water.
Hinged doors need a clear movement zone
A hinged screen can provide a defined opening, but the door needs room to travel. Check the full arc against the vanity, toilet, bath edge, towel rail and bathroom door. Do not judge clearance from a plan view alone if a handle or benchtop projects into the path at another height.
Sliding screens protect floor space
When a door cannot swing comfortably, sliding shower screens keep movement within the enclosure footprint. The trade-off is that tracks, rollers and overlapping panels add components that need cleaning and access for maintenance. Compare the clear entry opening as well as the total unit width, because part of the frontage remains occupied by the fixed or overlapping panel.
Corner screens solve a different geometry
Corner shower screens create a two-sided enclosure where the shower occupies a corner rather than a recess between walls. Confirm both side dimensions, the entry position and the relationship between the two panels. Ordering from one wall measurement alone is not enough for a corner installation.
Mistake 2: Measuring an Unfinished or Irregular Opening Once
One width taken at a convenient height is not a reliable basis for ordering glass. Tiled walls may not be perfectly parallel, floors can have fall, and the opening can change from the base to the top.
Measure the finished surfaces
Where possible, measure after the tiles and other finished surfaces are in place. If the order must be planned earlier, account for the build-up specified for the project and have the final selection checked once the opening is complete. A measurement across bare framing is not the same as the finished distance available to the screen.
For a wall-to-wall opening, record the width near the base, around the middle and near the intended top of the glass. Note the smallest result and the amount of variation. Then measure the available height and check whether the wall and floor surfaces are reasonably plumb and level. The product's stated adjustment or channel arrangement must be able to accommodate the actual opening.
Keep protrusions on the measurement sketch
Mark the mixer, shower head, niche, skirting detail, towel rail and any nearby fixtures on the same sketch. Include their distance from the proposed glass line. This exposes conflicts that a simple width-by-height note can hide, particularly where a stabilising pole needs a clear wall connection or a door handle projects beyond the glass.
Mistake 3: Assuming the Listed Width Is the Entry Width
The nominal size usually describes the overall screen or opening it is designed to occupy. It does not necessarily describe how much clear space a person has to enter.
A useful example is this 110 cm wall-to-wall frameless shower screen. Its listed components include a 650 x 1990 mm door panel and a 440 x 2000 mm hinge panel. The 110 cm overall description therefore should not be read as a 110 cm doorway.
Check the door-panel width, hinge arrangement, handle position and any overlap or fixed section. For a sliding model, look for the actual walk-through opening when the door is fully retracted. For a double-door corner enclosure, consider where the user stands before opening the panels and whether both doors can move without meeting another fixture.
Access also has a maintenance dimension. A narrow opening may feel acceptable in daily use but make it difficult to reach the inside face of the glass, tracks or corner joints. The right choice should support entry, exit and cleaning, not merely fit between the walls.
Mistake 4: Forgetting Door Swing and Bathroom Traffic
A dimensionally correct screen can still make the room awkward. Imagine the bathroom in use: one person steps out of the shower while another needs the vanity, the main door is partly open, and a bath mat occupies the floor. The shower door should not force those elements into conflict.
Trace the proposed door arc on the floor with removable tape. Repeat the check at handle height if nearby fixtures project into the space. Allow for the user's hand on the handle and for comfortable movement around the open panel. If the hinged option crowds the route, compare a slider, an inward-operating configuration where the exact product permits it, or an open fixed-panel layout with suitable water control.
Do not assume a door is reversible. Left-hand and right-hand installation, inward and outward movement, and hinge placement are product-specific. Confirm the instructions for the exact model before treating a different orientation as part of the plan.
Mistake 5: Treating Every Glass Panel as Interchangeable
Glass thickness, panel size, hole positions, edge treatment and mounting method work together. A bracket, hinge or support designed for one arrangement should not be assumed to suit another simply because the finish matches.
Clear glass keeps sightlines open and makes feature tiles visible. Reeded glass adds visual texture and more screening, but its surface orientation and cleaning access should be considered before the panel is positioned. Framed, semi-frameless and frameless formats can also use different glass and support arrangements. Compare the complete system rather than treating the panel as a decorative insert.
This is particularly important when combining separately listed parts. Match the stated glass thickness and mounting type, then confirm whether the glass requires pre-drilled holes. Hardware that grips an unperforated panel is not automatically a replacement for a hinge or handle that passes through prepared holes.
Mistake 6: Expecting the Screen to Correct Poor Water Planning
A shower screen manages water; it cannot compensate for every outlet angle, floor condition or undersized enclosure. Before choosing a fixed panel or open entry, consider where the shower head directs spray, how far the user stands from the opening and whether water can rebound from the body or wall toward the bathroom floor.
Match containment to the way the shower works
A deeper walk-in area can suit a fixed panel because the open entry sits farther from the main spray zone. A shallower enclosure may need a door or a longer return to improve containment. In a corner, both exposed sides and the meeting point between panels matter. Over a bath, the screen must relate to the bath rim and the position of the shower outlet rather than to the room floor.
Check seals, channels and the base as a system
Door seals, bottom strips and channels need the correct contact surfaces to do their job. Look at where water will travel at the base and how the selected components return it toward the shower area. If the floor, base or bath rim presents an unusual profile, ask the installer to check it before ordering. Adding more sealant after fitting is not a substitute for choosing a compatible screen and base arrangement.
Mistake 7: Reading the Product Image Instead of the Included-Items List
Product images often show a complete styled configuration or optional components. The title, selected variant and included-items list determine what is supplied. Check them together before assuming that a pole, channel, floor fixing, seal, handle or extra bracket is part of the package.
For example, the live listing for a 120 x 210 cm reeded glass screen with white channels specifies a 10 mm reeded panel, a 2100 mm wall channel and a 1200 mm floor channel. Both channels are described as being cut to size during installation. That detail affects preparation, tools and the final fixing method.
Check the selected colour and support option after every variant change in the product selector. Then write a simple received-items checklist from the listing. It is much easier to identify a missing or mismatched component before installation day than while a large glass panel is waiting to be fitted.
Mistake 8: Choosing Hardware by Finish Alone
Matching hardware to tapware creates a coordinated result, but compatibility comes first. Brackets, channels, hinges and stabilising poles differ in how they connect to the glass, wall and floor.
The 110 x 210 cm fixed glass screen with gunmetal brackets and a square pole shows why the details matter. Its listing pairs a 10 mm panel with two offset brackets and a horizontal stabilising pole adjustable from 760 to 1200 mm. A buyer must therefore confirm a suitable fixing point within that pole range and enough clear space at the top edge of the panel.
Use the shower screen accessories collection to compare component types, but match each item to the exact glass and installation plan. Also check the wall material and the position of concealed services before drilling is considered. A coordinated finish cannot rescue hardware that is wrong for the panel or fixing surface.
Mistake 9: Leaving Installation Decisions Until Delivery Day
Large glass panels require a clear route from the delivery point to the bathroom, suitable handling and prepared fixing surfaces. Measure hallways, turns, stair access and doorways as part of the purchase decision. A screen that fits the shower recess may still be difficult to move through the home.
Discuss the proposed fixing line with the installer before ordering, particularly for frameless glass, wall-to-wall doors and panels using stabilising poles. Confirm who will check the finished opening, whether the supplied hardware suits the wall and floor, and what site preparation must be complete. The Factory Fast guide on how to fit and install a shower screen is a useful planning reference, but the instructions for the selected product remain the controlling source.
Do not book tightly connected trades around an assumed fit. The screen should be checked against the finished space and its supplied components before the installation sequence depends on it.
A Better Order for Choosing a Shower Screen
Use this sequence to keep style decisions from hiding practical problems:
- Define the geometry: wall-to-wall recess, corner, open walk-in area or shower over bath.
- Choose the operation: fixed, hinged, sliding, folding or a combined configuration.
- Measure finished widths, height, wall variation and nearby obstacles.
- Check actual entry width, door movement and cleaning access.
- Review water direction, enclosure depth, seals and the base or bath-rim relationship.
- Match glass thickness, holes, channels, brackets, hinges and support components.
- Confirm every included item and the selected variant.
- Validate the delivery route and installation plan.
- Select the hardware finish once the practical shortlist is sound.
This order turns the purchase into a controlled comparison. Two screens that look similar can require different clearances, fixing points and maintenance access, so compare the specifications that affect the room before comparing colour.
Make the Final Check Specific to Your Bathroom
The best shower screen is not the most minimal, the largest or the one with the most fashionable hardware. It is the configuration that fits the smallest finished measurement, provides usable access, manages the expected spray and arrives with hardware suited to the glass and fixing surfaces.
Before placing the order, create a one-page evidence pack for the exact product: dated photos showing the tape measure at the top, middle and base of the opening; a photo of the full door-clearance zone; the selected product variant; and a copied list of included components. Ask the installer to review that pack. This final check can reveal a wrong assumption while the choice is still easy to change.
Frequently Asked Questions
Related Articles
-
 Tags:
Shower Screens
Tags:
Shower Screens