1300 760 441
 cs@factoryfast.com.au
How to Measure for a Shower Screen: A Practical Bathroom Fit Guide
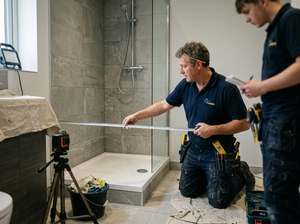

Measuring for a shower screen is not just recording one width and choosing the closest product. The correct size depends on the shower shape, door movement, wall line, bath edge, panel height and how water moves through the space. Before browsing shower screens, measure the bathroom as a working area, not just an empty opening.
Step 1: Identify the shower screen type first
The measuring process changes depending on the screen style. A fixed walk-in panel, wall-to-wall door, corner enclosure, sliding system and bath screen all use space differently.
Fixed walk-in panel
A fixed panel needs width, height and support clearance. It does not need door swing, but it does need enough length to reduce splash. Browse shower panels when the shower is open on one side and you want a simple glass barrier rather than a full enclosure.
The 80 x 210cm glass shower screen with nickel F-brackets and square pole is a practical fixed-panel example. It has an 800 x 2100mm glass panel, nickel F-brackets and a square stabilising pole adjustable from 760mm to 1200mm. That means you need to check panel width, vertical height and the wall position for the pole.
Wall-to-wall screen
Wall to wall shower screens suit a recess. Measure the width between the two sides at the bottom, middle and top, because walls are not always perfectly even. Use the smallest measurement as the working width when comparing products.
Also check where the door will open. The width may fit, but the door path may still clash with a vanity, toilet or towel rail.
Corner screen
Corner shower screens need two footprint measurements: the front opening and the return depth. If the screen has hinged doors, mark the swing area on the floor with tape before buying. That quick check often reveals problems that a width measurement alone will miss.
Sliding screen
Sliding shower screens are useful when the room does not have space for a hinged door. Measure the full opening width, the return side and the rail path. The 170 x 80cm frameless sliding corner shower in chrome hardware suits an adjustable 1650-1740mm door width and includes a 797 x 2000mm side panel with a 1950mm rail, so both the sliding span and side depth matter.
Bath screen
Bath screens need bath-edge measurements rather than floor measurements. Measure the bath rim where the screen will sit, the wall height from the bath edge and the clearance needed for any folding or pivoting movement. The 4-fold bath shower screen 100 x 140cm has a universal left/right fit and 10mm wall adjustment, which makes it useful where a compact bathroom needs showering and bathing to share the same zone.
Step 2: Measure width in more than one place
Take width measurements at the base, halfway up and near the intended top of the screen. If the numbers differ, the narrowest point matters most. This is especially important for frameless glass because there is less frame coverage to disguise uneven wall lines.
For fixed panels such as the 80 x 210cm glass shower screen with nickel F-brackets and floor F-bracket, also check the floor fixing position. The product includes an 800 x 2100mm panel and nickel wall/floor F-brackets, so the floor surface and wall position both affect the final fit.
Step 3: Measure height and check overhead clearance
Measure from the finished floor or bath rim, not from an unfinished surface. If tiles are still being installed, wait until the finished level is known or allow for the finished height in your planning.
Tall panels around 2000mm to 2100mm can look clean and generous, but they need clear vertical space. Check ceiling height, shower head position, shelving, niches and any overhead obstructions. A panel that fits on paper can still feel awkward if it crowds a fixture.
Step 4: Check door movement and access
A shower screen should fit the person using it, not only the wall opening. Stand where the entry will be and test the movement path. For hinged screens, mark the swing. For sliding screens, check that the entry opening will feel comfortable once one panel overlaps another.
In smaller bathrooms, the best measurement may point you away from a hinged door and toward a sliding or fixed format. That is a buying improvement, not a compromise.
Step 5: Confirm hardware and surface conditions
Hardware needs a suitable fixing surface. Brackets, wall channels and stabilising poles all rely on the wall or floor being ready for that type of support. Check whether the product uses wall brackets, floor brackets, a channel, a stabilising pole or a rail before deciding.
If measurements are close, avoid choosing the largest possible screen just because it technically fits. A slightly more suitable format with better clearance will usually feel better than a wider panel that makes the room harder to use.
Before ordering, write down three things on the same note: the smallest finished width, the finished height and the obstruction that sits closest to the shower entry. That last detail is the one buyers often forget, and it is usually what decides whether the screen feels effortless or annoying after installation.
Frequently Asked Questions
Related Articles
-
 Tags:
Shower Screens
Tags:
Shower Screens