1300 760 441
 cs@factoryfast.com.au
Kitchen Accessories and Utensils Buyer Guide: Choose Tools for Prep, Cooking and Storage
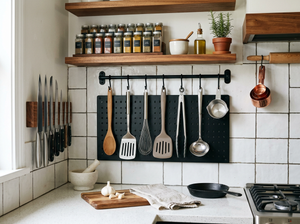

A utensil drawer can be full and still fail at dinner time. What matters is whether the right tool is within reach, suits the cookware, handles its task cleanly and has somewhere sensible to live afterwards. A pile of duplicates is little help when the missing item is a reliable turner, accurate scale or workable pantry organiser.
This buyer guide approaches kitchen accessories and utensils by use case. It will help you build a practical core kit, identify specialist tools worth adding, compare materials, check dimensions and plan storage before buying. The aim is a kitchen that supports the way you actually prepare food, rather than a collection of gadgets chosen in isolation.
Start with the jobs your kitchen tools must perform
Before comparing sets, list the recurring actions in your kitchen: stirring, turning, lifting, draining, whisking, measuring, rolling, serving and storing. Then separate daily tasks from occasional ones. A household that cooks on the stovetop most nights will gain more from dependable spoons, a turner, tongs and a ladle than from a specialist baking accessory used twice a year.
This creates a simple decision path. First cover frequent cooking and serving jobs. Next add tools that protect or complement your cookware. Then select precision or baking equipment for the recipes you genuinely make. Finally, decide how everything will be stored, cleaned and returned to its place. Buying in that order reduces overlap and makes omissions easier to spot.
Core tools versus specialist accessories
A core utensil earns its place through repeated use across several meals. Tongs can move vegetables, turn food and serve salad. A solid spoon can mix, portion and serve. A slotted turner lifts food while leaving liquid or oil behind. A ladle suits soup, sauce and batch cooking. These multi-use shapes should form the foundation of a new kitchen.
Specialist kitchen accessories are worthwhile when they improve control, consistency or speed for a repeated task. A digital scale supports recipes that depend on measured quantities. A rolling pin gives better coverage and pressure control than an improvised bottle. A rotating organiser makes sense when jars at the back of a deep cupboard are otherwise forgotten. The test is not whether an accessory looks clever; it is whether it removes a recurring point of friction.
Sets versus individual pieces
A coordinated set can be efficient for a first home, a cookware upgrade or a drawer that needs a complete reset. Check the piece list rather than relying on the number printed in the title. A holder may count as one piece, and several spoons can have overlapping jobs. Compare the included shapes with your task list and make sure the pieces you will use most are present.
Individual tools suit an established kitchen with a specific gap. If your current whisk, tongs and ladle work well, replacing everything to obtain one missing spatula adds clutter. Browse the kitchen accessories and utensils collection with a short gap list so each purchase has a defined role.
Choose utensil materials to match your cookware and handling preferences
Material affects contact with cookware, grip, cleaning and storage. No single material is best for every job. A well-planned kit may combine softer silicone working ends for coated pans, stainless steel for non-porous preparation tools and timber accents where a comfortable dry grip matters.
Silicone for coated cookware and flexible contact
Silicone heads provide softer contact than exposed metal, making them a practical choice for non-stick pots and pans. Flexible edges can follow the curve of a bowl or pan, while solid and slotted shapes cover different stirring, lifting and serving jobs. Check what the handle is made from as well as the working end, because cleaning instructions can differ when silicone is paired with timber.
For a broad starter kit, the 13-piece silicone kitchen utensil set with holder combines twelve tools with benchtop storage. Its grey silicone heads and natural wood handles cover pasta serving, basting, stirring, ladling, whisking, gripping and turning. It is designed for non-stick cookware and includes hanging hooks, so it suits buyers who want coverage and storage in one purchase.
Stainless steel for firm tools and non-porous surfaces
Stainless steel is useful where rigidity, a smooth surface and straightforward wipe-down matter. It works well for items such as scales, rolling tools and organisers. For utensils that touch a coated pan, however, check the cookware maker’s care guidance before choosing a hard metal edge. The broader kitchenware collection can help you consider tools and cookware as one system rather than two unrelated purchases.
Finish also affects ownership. Brushed surfaces can make everyday marks less prominent than highly reflective ones, while joins, seams and deep crevices can take longer to clean. Inspect the full construction, not merely the headline material. A stainless working surface with a plastic housing, for example, should be assessed according to how and where it will be used.
Timber and bamboo for grip, display and dry storage
Woodtone handles and bamboo organisers can soften the look of an exposed benchtop and may feel comfortable in the hand. Their main trade-off is care. Avoid assuming that every timber component can soak in a sink or go through a dishwasher. Check the exact cleaning directions, dry the item properly and consider whether your household is likely to follow that routine.
Use timber where its handling or appearance adds value, not simply because it matches the room. If a tool will often be left wet, stored beside the sink or used with strongly coloured ingredients, a non-porous alternative may demand less attention.
Build an everyday cooking kit around your actual meals
The best utensil mix depends on what moves through your kitchen. Start with a one-week meal pattern and map each recurring dish to the actions it requires. Stir-fries call for turning and tossing tools. Soups and sauces need a ladle and stirring spoon. Pasta benefits from tongs or a pasta server. Baking brings measurement, scraping, brushing and whisking into the core routine.
For stovetop meals
Prioritise a solid spoon, slotted spoon or turner, spatula and tongs. The turner should fit comfortably beneath the foods you cook, and the handle needs enough length to keep your hand away from the cooking surface without becoming unwieldy in a shallow drawer. If you use coated pans, select working ends that will not undermine the surface through routine scraping.
A spoon rest is easy to dismiss, but it has a clear workflow role when the same utensil returns to the pan repeatedly. It gives the wet working end a defined place and prevents the cooktop or benchtop from becoming the default. This is the kind of small accessory that earns space through repeated convenience rather than novelty.
For soups, sauces and serving
A ladle should match both vessel and portion. A very deep bowl can be awkward in a small saucepan, while a short handle may be inconvenient with a tall stockpot. Serving spoons should also fit the dishes used at the table. Think about the complete movement from pot to bowl, including where the utensil rests between portions.
If storage is tight, favour tools that can cover cooking and serving without looking out of place at the table. If you regularly host larger meals, dedicated serving pieces can keep the cooking tools available for last-minute preparation. The right answer depends on whether compactness or simultaneous use matters more.
For non-stick cookware
Compatibility should be treated as a buying requirement, not a later care issue. Check the surface each tool will contact, including pan edges and corners. A suitable spatula needs both a cookware-friendly material and a shape that reaches the food without forcing you to scrape with the handle or another improvised edge.
Also check heat exposure and resting habits on the exact product page. Do not assume every item within a broad material category has the same limits. Keep utensil heads away from direct flame, and provide a rest or holder so tools are not left against hot cookware for longer than the task requires.
Add precision tools when consistency matters
Some food preparation tools solve a different problem from spoons and spatulas: they turn judgement into a repeatable measurement. They are most useful for baking, portioning and recipes where a small change in quantity affects texture or balance. Before buying, check minimum and maximum capacity, increment or stated error range, platform size, controls, power supply and storage footprint.
Check the scale’s usable range, not just its maximum
A high maximum capacity is useful for bowls and batches, but the lower end matters for light ingredients. The rechargeable 3 kg digital kitchen scale measures from 0.5 g to 3 kg with a stated error range of plus or minus 0.3 g. Its footprint is 22 x 17.5 cm and it stands 3.5 cm high, so buyers can check both bowl fit and drawer clearance before ordering.
Think about the container as well as the ingredients. The scale must support the combined weight of the bowl and contents, while leaving the display visible. A tare function is especially useful when several ingredients are added to one vessel, but the controls should remain accessible once that vessel is in place.
Plan a clean, level measuring position
A scale needs a stable surface and enough surrounding space to place and remove a bowl without knocking other items. If the only available spot is an uneven draining board or crowded shelf, even a capable device will be frustrating to use. Measure a permanent or repeatable position before choosing the platform size.
Storage should protect the measuring surface from heavy objects and spills. Keep the charging cable or batteries with the appliance rather than in a general-purpose drawer. The easier the scale is to retrieve, power and reset, the more likely it is to become part of the routine instead of an abandoned purchase.
Select baking tools by dough type, batch size and control
Baking accessories deserve their own decision process because the right shape and material depend on what you make. A tool for pastry needs smooth, controlled pressure; a whisk should suit the volume and vessel; a spatula must reach bowl curves; and a basting brush needs an appropriate width for glazes or oils.
Match a rolling pin to the work surface
Measure the usable preparation area before buying a long roller. Allow room for the tool to travel beyond the dough without striking a splashback, appliance or raised benchtop edge. A wide roller can cover a large sheet efficiently, but it becomes awkward if the available surface is narrow.
The 42.5 cm stainless steel rolling pin is a handleless, 250 g design for pastry, fondant, dough and flatbread. Its brushed matte surface can be chilled or warmed for the chosen preparation method, and the listed dishwasher-safe construction suits bakers who prefer a non-porous tool with simple clean-up.
Choose pieces that work together
A baking kit does not need every possible accessory. Begin with the sequence your recipes follow: measure, combine, mix, shape, transfer and finish. Then cover only the steps where your current equipment is slow or inconsistent. A scale and flexible spatula may add more value to frequent cake baking than several decorative tools.
Storage dimensions matter here because long or irregular items are often the first to jam a drawer. Check whether a rolling tool lies flat, hangs securely or requires a deeper cupboard. An accessory that cannot be stored without obstructing daily tools has an ongoing space cost that should be considered before purchase.
Make storage part of the buying decision
Kitchen organisers should improve access, not merely fit more items into a cupboard. Group tools by where they are used: stovetop items near the cooking zone, preparation equipment near the main work surface, baking accessories together, and serving pieces close to crockery. Frequently used items deserve the easiest positions; occasional pieces can occupy higher or deeper storage.
Measure the inside, opening and movement space
For an organiser, measure the internal width, depth and height of the intended cupboard. Then check the opening, hinge position and any lip around the shelf. A rotating unit also needs clearance throughout its full movement, including for jars that extend beyond the platform edge.
The two-tier stainless steel Lazy Susan organiser measures 26.67 cm in diameter and 15.24 cm high. Its raised rim and two rotating levels suit spices, condiments or small table items, but the usable decision is whether that diameter can turn freely with the intended containers loaded.
Decide between drawers, holders and vertical storage
Drawers keep visual clutter down and protect tools from airborne cooking residue, but they need enough width and depth for the longest items. Benchtop holders make everyday utensils faster to reach, although they consume preparation space and require regular cleaning. Hanging storage can free both surfaces, provided there is a suitable fixing point and tools do not obstruct doors, splash zones or walkways.
Do not buy an organiser until you have counted and measured what it will hold. Capacity described in tiers or compartments does not reveal whether your tallest bottle, widest utensil head or longest handle will fit. Lay the intended group together, remove duplicates, then size the organiser around the remaining items.
Plan the preparation-to-clean-up workflow
The most useful kitchen accessories support movement through the room. Imagine preparing one regular meal from start to finish. Where do ingredients arrive? Where are they washed, measured and cut? Which tools cross between the sink and cooktop? Where do scraps go, and where do wet utensils wait before cleaning?
Keep the busiest path short
Place preparation tools close to the main clear work surface and cooking utensils within easy reach of the cooktop. Avoid forcing the cook to cross a walkway while carrying a wet spoon or hot pan. The storage position should reflect point of use, even if another drawer looks more symmetrical.
Waste handling belongs in the same plan. The kitchen bins collection includes freestanding and concealed configurations that can be compared with available floor or cabinet space. Position and capacity should suit the preparation zone without blocking cupboard doors or the route between sink and cooktop.
Check cleaning before checkout
Read the specific care directions for every material and mixed-material item. A dishwasher-safe stainless tool may suit a busy household, while a piece with a timber handle may need prompt hand washing and drying. Removable parts can make access easier, but only if they are simple to reassemble and unlikely to be misplaced.
Look for places where residue can collect: joins, hollow handles, narrow slots, raised rims and the base of a holder. The more frequently an accessory touches wet or sticky food, the more important easy access becomes. A tool that saves one minute during preparation but adds several awkward cleaning steps may not improve the full routine.
Avoid the kitchen accessory mistakes that create clutter
The first mistake is buying by piece count. A large set offers poor value when several components duplicate tools already owned or do not suit the cookware. Compare the actual shapes, materials and storage additions against a written gap list.
The second is ignoring dimensions. Scales need room for the bowl and display, rolling tools need travel space, and pantry organisers need movement clearance. Product width alone may not capture the real footprint once handles, containers or cables are added.
The third is choosing appearance before care. A displayed holder, timber handle or polished surface becomes part of the cleaning routine. Decide whether the finish suits the way the household cooks and cleans, not only the way the kitchen looks when unused.
The fourth is treating storage as an afterthought. Every new item needs a defined home before it arrives. If that home displaces a tool used more often, the purchase has made the kitchen less functional. One-in, one-out is a useful rule for duplicate turners, spoons and single-purpose gadgets.
Use a final four-part check before buying
Ask four questions about each shortlisted item. What repeated job will it perform? Is its material compatible with the cookware, food and cleaning method? Do its exact dimensions fit both the working area and storage position? Will it remain easier to use than the tool or method it replaces?
If any answer is unclear, return to the product specifications rather than filling the gap with an assumption. Product ranges and prices change, so compare the live listing at checkout. During research for this guide, the linked examples occupied distinct price and use bands, from a compact pantry organiser under $20 to a broad utensil set around $36; the better value is the one that solves a frequent, measured need.
Before placing an order, empty the target drawer or cupboard and outline the intended footprint with low-tack tape. Then perform one normal meal-preparation sequence around it. This simple rehearsal can reveal a blocked hinge, cramped bowl position or unreachable utensil holder before the accessory becomes a permanent part of the kitchen.
Frequently Asked Questions
-
 Tags:
Kitchenware
Tags:
Kitchenware