1300 760 441
 cs@factoryfast.com.au
How To Maintain Modern Shower Screen Hardware

Quick Hardware Care Essentials (Answer First)
Modern shower screens installed from around 2015 onwards rely heavily on exposed hardware—hinges, brackets, channels, and handles—that needs consistent care to perform safely and look good. Unlike older framed systems where metal was mostly hidden, today’s frameless and semi-frameless designs put hardware front and centre, making daily and weekly maintenance non-negotiable if you want to avoid corrosion, pitting, and water leaks.
Here are the absolute must-do habits for keeping your shower screen hardware in top condition:
-
Wipe down hardware daily after each shower using a soft microfibre cloth to remove water droplets before they dry into mineral deposits
-
Use a squeegee to squeegee glass after each shower to prevent water stains and mineral deposits from forming on shower screens
-
Clean hardware weekly with warm mild soapy water and a soft cloth or sponge, then rinse thoroughly with clean water and dry completely
-
Check screws, seals, and brackets monthly for looseness, cracking, or early signs of rust—tighten gently where needed
-
Avoid harsh chemicals including bleach, ammonia-based cleaners, and abrasive materials that can permanently damage protective coatings
-
Keep your bathroom well-ventilated by running an exhaust fan or opening a window for 20-30 minutes after showering
-
Always run an exhaust fan for at least 15–20 minutes after showering to reduce humidity.
Maintaining a dry and ventilated bathroom is essential to prevent mold and mildew growth around shower screens.
These tips apply across all common modern finishes—polished chrome, brushed nickel, matte black, and brass tones—and work for frameless, semi-frameless, and fully framed screens alike.
The payoff for consistent care now? You prevent corrosion, finish pitting, loose hinges, and water leaks that would otherwise show up within 5-10 years. A few minutes of regular cleaning beats an expensive hardware replacement every time.
Understanding Modern Shower Screen Hardware
When we talk about modern shower screen hardware, we’re referring to all the non-glass components that make your shower enclosure function and look finished. In Australian and UK bathrooms since around 2010, this typically includes hinges (wall-to-glass and glass-to-glass), wall brackets, U-channels, stabiliser bars, sliding door rollers and tracks, handles, knobs, clips, and floor seals.
Hardware Differences by Screen Type
-
Frameless screens rely on precision-engineered, fully exposed hinges, clamps, and stabiliser bars. Because nothing is hidden, these components need the most visible care and are most vulnerable to water spots and residue buildup.
-
Semi-frameless screens combine minimal framing (usually along one or two edges) with exposed hardware. They include more channels and gaskets that can trap water, soap, and hair.
-
Fully framed screens use continuous aluminium or stainless steel frames around all edges, along with sliding tracks and rollers. While hardware is somewhat protected, the frames and channels collect moisture and require regular cleaning to prevent mould and corrosion.
-
Frameless hardware bears more structural load per fitting, so regular inspection and tightening matters more than with framed systems.
Common Materials and Finishes
-
304 and 316 stainless steel offer excellent corrosion resistance, especially 316-grade for coastal homes. Brass bodies with stainless screws are common in quality hinges and brackets.
-
Zinc alloy and plated brass are used in mid-range hardware, typically with decorative chrome, brushed nickel, or powder-coat finishes.
-
Finishes include polished chrome (durable but shows water spots), brushed nickel (prone to tea-staining near the coast), matte black powder-coat (shows soap streaks and scratches easily), and PVD brass/gold (harder wearing but still needs gentle care).
Different finishes age differently, which directly affects your cleaning approach:
-
Chrome tends to show water spots and fingerprints quickly but handles light vinegar solutions well
-
Matte black and powder-coated surfaces reveal every soap streak and can chip if scrubbed with abrasive cleaners
-
Brass and bronze tones may develop patina over time, which some homeowners like but others prefer to prevent with regular drying
A diagram of a frameless screen with labelled hardware—showing hinges, stabiliser bar, wall brackets, handle, and bottom seal—would be helpful here for visual reference.
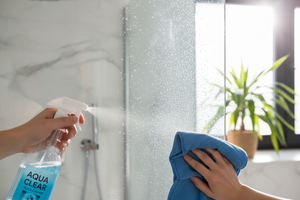
Daily and Weekly Cleaning Routines for Hardware
Investing just 2-3 minutes in daily and weekly hardware care will typically prevent the need for heavy restoration work or premature hardware replacement in the first 7-10 years of your screen’s life. This is where shower screen maintenance pays the biggest dividends.
Regular cleaning is crucial to remove soap scum, mineral deposits, and other contaminants that can degrade the glass over time.
Daily Cleaning Steps
-
Run a plastic squeegee down the shower glass surfaces near hardware after each use to remove water droplets.
-
Rinse shower screen and hardware daily to prevent mineral buildup.
-
Wipe down all metal hardware with a soft, dry microfiber cloth.
-
Wiping down the shower screen daily can drastically reduce stain build-up and prevent mold growth.
-
Use a squeegee to remove excess water from the glass and hardware.
-
Using a squeegee after each shower helps minimize water spots and mineral deposits on shower screens.
Your Daily Routine (Right After Showering)
-
Run a plastic squeegee down the glass surfaces near hardware to shed most of the water before it can dry
-
Quickly wipe hinges, brackets, and handles with a soft microfibre cloth to catch any remaining water droplets
-
Pay attention to the bottom edge where water naturally pools around seals and channels
This 60-second habit prevents the vast majority of mineral deposits and soap residue from ever setting on your metal or glass surfaces.
Weekly Cleaning Steps
-
Mix a few drops of pH-neutral dishwashing liquid into warm water—this serves as your cleaning solution for the entire shower screen
-
Using a soft cloth or sponge, gently clean all hardware including hinges, handles, brackets, and visible channels
-
Rinse thoroughly with clean water to remove any soap residue, which can leave a film if allowed to dry
-
Dry all hardware immediately with a clean, dry towel to prevent water spots and streaking
Trouble Spots
-
The bottom edge hardware, wall channels, and areas around screws collect the most shampoo, body wash, and grime and soap scum
-
Use a soft toothbrush or cotton bud to reach into crevices around hinge pins and set screws where buildup hides
Keep all routines gentle—no scrubbing pads or bristle brushes. And remember that ventilation supports hardware longevity: run your exhaust fan or crack a window for at least 20-30 minutes after every shower to maintain a dry ventilated bathroom.
Safe Cleaning Products and Tools for Different Finishes
Using the right products protects the protective coatings on your hardware and avoids voiding manufacturer warranties—many of which, particularly those issued from around 2020 onward, explicitly forbid certain chemicals.
Safe Tools
-
Soft microfibre cloths and non-scratch sponges for general wiping and weekly cleaning
-
A soft toothbrush for cleaning around screws, corners, and crevices where a non abrasive cloth can’t reach
-
A plastic squeegee (never metal) for removing excess water from glass and nearby hardware without scratching
Safe Cleaners
-
Warm soapy water using a mild detergent or pH-neutral dishwashing liquid—this covers 90% of cleaning needs
-
A diluted vinegar solution (equal parts white vinegar and water) works for stainless steel and chrome, but avoid using it near marble, stone, or grout
-
Approved non-abrasive bathroom cleaners that specifically state they’re safe for coated metal surfaces
What to Avoid
-
No cream cleansers, which contain fine abrasives that dull finishes over time
-
No bleach or chlorine-based products—these pit stainless steel and degrade rubber seals
-
No ammonia or alcohol base cleaners, which can cause permanent staining on anodised aluminium surfaces
-
No steel wool, scouring pads, or abrasive pads under any circumstances
-
No magic erasers (melamine foam), which act as fine abrasives and will scratch both glass and metal
-
No acidic descalers applied directly to plated or powder-coated parts
Finish-Specific Notes
-
Chrome and stainless steel tolerate light white vinegar and water solutions for removing water spots, followed by a thorough rinse
-
Matte black and powder-coated finishes require only a damp soft cloth with mild soap—nothing stronger—and show scratches easily
-
PVD brass and gold finishes should be cleaned with very mild soap only, and surfaces clean immediately after with a dry cloth to prevent spotting
Preventing Rust, Corrosion and Pitting
Hard water, coastal air (common in Sydney, Perth, Auckland, and many UK coastal towns), and strong cleaners can cause visible rust on screws, brackets, and channels within just a few years if hardware is neglected. Keeping metal parts of shower screens dry is crucial to prevent rust. Prevention is far easier than treatment.
Consistently wipe hardware and the dry aluminium frame after each use to prevent spots and scum, especially in hard water areas.
Understanding the Difference
-
Tea-staining on stainless steel appears as brown discolouration caused by localised surface corrosion, often from chloride exposure in coastal environments—it’s mainly cosmetic but signals that rinsing and drying habits need improvement
-
True rust on mild steel fasteners (often hidden screws or cheaper brackets) indicates actual corrosion that weakens the hardware structurally
-
Tea-staining can often be cleaned away; rust on structural parts usually means replacement is needed
Rust Prevention Habits
-
Always dry hardware after cleaning and after showering in hard water or coastal areas
-
Avoid leaving wet washcloths or loofahs hanging on metal handles or stabiliser bars where moisture sits
-
Keep shampoo bottles, razors, and metal cans off metal channels and bars where they can trap water and cause contact corrosion
Dealing With Early Marks
-
For light marks, use a non abrasive sponge or soft sponge with mild soap, working in circular motions rather than scrubbing aggressively
-
For stainless steel, a dedicated stainless-steel cleaner approved for bathroom use can help—apply, then rinse thoroughly with clean water and dry fully
-
Persistent spots may respond to a baking soda paste (baking soda mixed with water to form a paste), applied gently, rinsed, and dried
When to Call a Professional
-
If rust reappears quickly after cleaning, or you notice bubbling, flaking, or lifting under the coating, the hardware should be inspected by a professional glazier
-
Structural rust on brackets, hinges, or channels that hold glass is a safety concern—don’t delay getting it assessed and potentially replaced
Hinges, Rollers and Moving Parts: Lubrication and Alignment
Smooth operation of pivot hinges, wall hinges, sliding door rollers, and guide channels is crucial not just for convenience but for safety. Stiff or misaligned hardware places stress on toughened glass and can lead to premature wear or even breakage.
Signs of Problems
-
Squeaking or grinding sounds when opening or closing doors indicate friction from dirt buildup or lack of lubrication
-
Stiff sliding doors that require excessive force to move suggest dirty tracks, worn rollers, or misaligned panels
-
A door that sags, scrapes tiles, or no longer aligns with magnetic seals signals hinge wear, loose fixings, or structural movement
Basic 3-6 Monthly Lubrication Routine
-
First, clean the hinge area, roller track, or pivot point with a damp sponge to remove soap scum and debris
-
Apply a small amount of clear silicone-based lubricant to hinge pins, pivot points, and rollers—a few drops is usually enough
-
Wipe off any excess lubricant immediately using a soft cloth to prevent drips reaching glass or attracting dust
-
For internal hinge components (if accessible), a small amount of white lithium grease provides longer-lasting lubrication
What Not to Use
-
Petroleum-based oils (including standard WD-40) attract dust, can degrade certain plastics, and may swell rubber seals over time
-
Heavy greases leave visible residue and create a dirt-trapping film on exposed hardware
-
Any lubricant that leaves an oily residue on glass should be avoided—use products specifically designed for bathroom hardware
When to Call a Professional
-
Major misalignment, significant door drop, or doors that won’t close properly should be checked by an installer
-
Attempting to force a misaligned door closed risks placing stress on the glass and can cause spontaneous breakage in toughened panels
Seals, Channels and Fixings: Inspection and Minor Maintenance
Bottom door seals, wall jambs, U-channels, screws, and wall anchors work together to keep water inside the shower and support the glass safely. These components are often overlooked but are essential for both waterproofing and structural integrity.
Monthly Inspection Checklist
-
Check all visible screws for looseness—hinges, handles, and bracket fixings can work loose over time from thermal cycling and daily use
-
Examine plastic and rubber seals for cracking, yellowing, hardening, or gaps that would allow water to escape
-
Look at silicone beads around wall channels, floor seals, and bracket bases for separation, mould growth, or deterioration
DIY vs Professional Tasks
-
You can handle: Sliding on a new clip-in bottom seal (these are usually inexpensive and available at hardware stores), gently tightening a loose handle screw with an appropriate screwdriver, and cleaning channels with a soft toothbrush
-
Call a glazier for: Loose or pulling wall channels, cracked glass anywhere in the screen, failing structural silicone around critical junctions, or any fitting that seems unstable
-
When in doubt, consult a professional—the cost of a service call is far less than replacing a complete screen or repairing water damage
Re-caulking Tips
-
Any re-caulking around channels should use a neutral cure, mould-resistant bathroom silicone—acidic cure silicones can attack some metals and finishes
-
Remove all old loose silicone completely before applying new sealant, and ensure the area is clean and fully dry
-
Apply in a continuous bead and smooth with a wet finger or caulking tool for a proper water-shedding profile
Critical Warning
-
Never overtighten screws into glass clamps, handles, or brackets—toughened glass is strong in service but sensitive to point stress
-
Excessive tightening creates stress concentrations that can cause spontaneous glass breakage, sometimes days or weeks after the overtightening occurred
Dealing With Hard Water, Soap Scum and Chemical Residue on Hardware
The same hard water and product residue that gradually clouds your glass shower screens will also etch and stain metal hardware over time. Glass cleaning and hardware care go hand in hand—neglecting one while maintaining the other defeats the purpose.
How Buildup Appears
-
Hard water leaves white or chalky marks (calcium and magnesium deposits) around brackets, hinges, and along metal channels
-
Body wash and shampoo residue creates a slippery film on handles and a sticky buildup on frame surface areas
-
Over time, these deposits combine into stubborn stains that become progressively harder to remove without risking damage
Safe Removal Methods
-
Mix equal parts white vinegar and water in a spray bottle—apply to stainless and chrome hardware with a soft cloth, avoiding contact with natural stone surrounds
-
Let the solution soak for 2-3 minutes to break down mineral deposits, then gently clean in circular motions
-
Rinse thoroughly with clean water and dry completely—residue remains on the surface if you skip this step, leading to fresh deposits
What to Avoid
-
Repeated use of strong limescale removers directly on anodised aluminium surfaces causes blotching and dull patches
-
Acidic cleaners on plated or brushed finishes can strip the coating, leaving the base metal exposed to corrosion
-
Never use undiluted vinegar or leave any vinegar solution sitting on hardware for extended periods
Prevention Strategies
-
In hard water areas, consider installing a water softener on your home supply to reduce mineral content reaching bathroom fixtures
-
A weekly light spray of diluted white vinegar and water on hardware (rinsed and dried afterward) can slow buildup before it becomes problematic
-
Prevent soap deposits by rinsing hardware well after each shower—this removes shampoo and body wash before it can dry and set
Long-Term Maintenance Schedule and When to Replace Hardware
Even well-maintained shower screen hardware usually needs some components replaced after 8-15 years, depending on usage intensity, bathroom environment, and original product quality. Planning for this reality helps you budget appropriately and avoid unexpected failures.
Recommended Maintenance Schedule
|
Frequency |
Task |
|---|---|
|
Daily |
Wipe down hardware with a soft cloth after showering |
|
Weekly |
Gentle clean with warm soapy water, rinse, and dry completely |
|
Quarterly |
Lubricate moving parts, perform detailed inspection of all fixings and seals |
|
Every 3-5 years |
Professional inspection for heavily used family bathrooms or coastal homes |
This schedule represents essential maintenance tips for extending the life of your new shower screen and its hardware.
Signs Hardware Needs Replacement
-
Persistent rust on structural parts (hinges, brackets, channels) that returns despite proper cleaning and drying
-
Peeling, flaking, or bubbling coating on hinges or brackets indicating corrosion beneath the surface
-
Stripped screw heads, loose wall anchors that spin without gripping, or fixings that won’t stay tight
-
Doors that won’t stay aligned despite professional adjustment—this often indicates worn hinge mechanisms
The Economics of Replacement
-
Replacing tired hardware components (handles, hinges, seals) while the glass is still sound is typically far cheaper than full screen replacement
-
A bath screen or shower enclosure with new hardware can look completely refreshed without the expense of re-glazing
-
Matching finishes can be tricky with older proprietary systems, so consider whether a coordinated update of all visible hardware makes sense
Documentation and Brand-Specific Care
-
Keep your manufacturer care instructions and warranty documents accessible—you’ll need them if making warranty claims or ordering replacement parts
-
Follow brand-specific advice for certain finishes, particularly matte black or PVD gold hardware installed from around 2018 onwards, which often have stricter cleaning requirements listed in the fine print
-
Read the entire guide prior to commencing cleaning with any new product to avoid inadvertently damaging finishes or voiding warranties
Key Takeaways
-
A soft microfibre cloth and only a damp sponge with mild soap handles 90% of your shower screen maintaining needs
-
Avoid abrasive materials and harsh cleaning agents—they cause more damage than the problems they’re trying to solve
-
Frequent cleaning with natural solutions like diluted vinegar beats occasional deep cleaning with aggressive chemicals
-
Moving parts need periodic lubrication with silicone-based products, not petroleum oils
-
Seals and gaskets are consumables—expect to replace them every few years rather than trying to restore heavily degraded ones
-
A glass cleaner alone won’t protect your hardware—metal surfaces need separate attention and drying
Conclusion
Maintaining modern shower screen hardware comes down to building simple, consistent habits rather than undertaking occasional marathon cleaning efforts. The combination of daily drying, weekly cleaning with warm water and a non abrasive cloth, and quarterly inspections will keep your hinges, brackets, handles, and channels functioning smoothly for a decade or more.
The essential maintenance tips in this guide work for chrome, brushed nickel, matte black, and brass finishes alike—the principles remain the same even as styles change. Protect finishes with gentle products, keep hardware dry, lubricate moving parts appropriately, and know when to call a professional for issues beyond your skill level.
Start today with the simplest step: keep a squeegee and dry microfibre cloth in your shower, and spend 60 seconds after each use removing water from both glass and hardware. That single habit will do more for your shower screen’s longevity than any product you can buy.
If your hardware is already showing signs of wear, don’t wait for complete failure—address loose screws, sticky hinges, or early rust spots now while they’re still manageable. Your future self (and your wallet) will thank you.
Related Articles
-
 Tags:
Shower Screens
Tags:
Shower Screens