1300 760 441
 cs@factoryfast.com.au
Can You Lay Vinyl Flooring Over Tile? Exploring Your Options

Updating your floors doesn’t always mean jackhammers, dust clouds, and weeks of disruption. If you’re staring at dated ceramic or porcelain tiles and wondering whether there’s an easier path forward, you’ve landed in the right place. This guide walks you through everything you need to know about installing vinyl flooring over your existing tile floors—from preparation through to the final reveal.
Can You Lay Vinyl Flooring Over Tile? (Quick Answer)
In most Australian homes, you can absolutely lay vinyl flooring over existing tiles—provided those tiles are structurally sound, reasonably level, and dry. You can install vinyl flooring over existing tiles. This approach has become increasingly popular because it sidesteps the mess, noise, and expense of tile removal while still delivering a fresh, modern look.
Your main options include:
-
Floating click-lock vinyl planks – snap together without adhesive, ideal for DIY projects
-
Glue-down vinyl – offers maximum stability but requires more preparation
-
Sheet vinyl – creates a seamless look across larger spaces
-
Peel-and-stick vinyl – a lighter-duty choice for small, smooth areas
This method works particularly well for kitchen, hallway, and living area makeovers where minimising disruption is a priority. Many homeowners complete these projects over a weekend without calling in professionals.
The rest of this article walks through the pros and cons, proper preparation techniques, installation steps, and alternative approaches—all written from the perspective of factoryfast.com.au to help you plan your project with confidence.
What Is Vinyl Flooring and Why Use It Over Tiles?
Vinyl flooring has come a long way from the thin, curling sheets of decades past. Today’s luxury vinyl planks, vinyl tiles, and sheet vinyl products are water resistant, durable, and remarkably realistic in their timber and stone appearances.
Modern vinyl flooring typically consists of several layers working together:
-
Wear layer – the transparent top coating that resists scratches, scuffs, and everyday traffic
-
Design layer – high-definition printing that creates realistic wood flooring or stone patterns
-
Core layer – provides stability, comfort underfoot, and often waterproof properties
-
Backing layer – helps the product sit flat and can provide additional cushioning
When installed over existing tile floors, vinyl delivers several advantages that matter in Australian homes:
-
Warmer underfoot – vinyl feels softer underfoot compared to cold ceramic tiles, especially appreciated during cooler months
-
Quieter – reduces the hard echo that tiled floors can create in open-plan spaces
-
No grout maintenance – say goodbye to scrubbing grout lines or watching them discolour over time
-
Design flexibility – modern vinyl can imitate everything from wide-plank hardwood floors to natural stone, suiting contemporary Australian interiors
Whether you’re refreshing a tired kitchen floor or transforming your living area, luxury vinyl flooring offers a practical path forward without starting from scratch.
For an easy DIY upgrade, the vinyl floor tiles collection offers durable, low-maintenance designs that replicate the look of real timber without the high cost.
Pros and Cons of Laying Vinyl Flooring Over Existing Tile
Covering tiles with vinyl can be an excellent shortcut to refreshed floors, but it’s not the right choice for every situation. Understanding both sides helps you make an informed decision.
The Pros
Going over old tiles rather than removing them offers several compelling benefits:
-
Avoids demolition – no jackhammers, no disposal costs, and no risk of damaging the subfloor beneath
-
Faster project turnaround – many homeowners complete installation in a single weekend
-
Less mess and noise – your neighbours and family will thank you
-
Cost effective option – tile removal and disposal can add significantly to renovation budgets
-
Modern appearance – instantly updates dated tiles with contemporary designs
-
DIY-friendly – floating floor systems don’t require specialist skills or tools
The Cons
However, this approach does come with limitations worth considering:
-
Raised floor height – adding vinyl increases the finished floor level, which can affect door clearances, dishwasher installation, and transitions to adjacent rooms
-
Different feel underfoot – while softer underfoot than bare tiles, vinyl over tile can feel slightly firmer than vinyl over timber subfloors
-
Tile condition matters – loose tiles, deep grout lines, or damaged tiles will cause problems that show through to your new flooring
-
Tiles become inaccessible – once covered, any issues with the tiles underneath are difficult to address
These considerations apply differently depending on your space. Kitchens require careful attention to appliance heights, while hallways need smooth transitions to other rooms. Laundries and bathrooms demand extra focus on moisture management.
Key Checks Before You Decide to Go Over Tile
Before ordering vinyl from factoryfast.com.au, take time to properly assess your existing tiled floor. These key considerations will determine whether installation over tile will succeed.
The existing tile must be in good condition and the tile surface should be structurally sound, plain, smooth, clean, and dry before laying vinyl flooring.
Tile Condition
Walk across the entire floor, listening and feeling for problems. Tiles must be firmly fixed to the substrate—not drummy or hollow-sounding when tapped. Look for widespread cracking, as this often indicates movement in the subfloor beneath. A few minor imperfections can be addressed, but extensive damage suggests the tiles themselves are failing.
Any loose tiles need to be either securely refixed or removed and filled before vinyl goes down. Installing over unstable tiles guarantees premature failure of your new flooring.
Surface Flatness
Deep grout lines present a particular concern. Over time, vinyl will conform to whatever sits beneath it—meaning those grout patterns may telegraph through to the surface. Significant lippage between tiles (where one edge sits higher than its neighbour) creates the same problem.
Use a straightedge or long spirit level to check for dips and high spots. Variations greater than a few millimetres should be addressed with a self leveling compound before installation.
Subfloor Integrity
The structure beneath your tiles matters too. Whether it’s a concrete slab or timber flooring, the subfloor should feel solid and stable with no noticeable movement when walked on. Springy or bouncy floors suggest structural issues that covering with vinyl won’t resolve.
Moisture History
For kitchens, laundries, and bathrooms, investigate any history of water damage or ongoing moisture issues. Check for staining, efflorescence (white salt deposits), or musty odours. These problems need investigation and resolution before you cover the tiles—otherwise, you’re simply hiding issues that will worsen over time.
Height Considerations
Measure the floor height increase that vinyl will create, then check:
-
Door clearances (will doors still open freely?)
-
Built-in cabinetry and kickboards
-
Fixed appliances such as dishwashers and fridges that slide under benchtops
-
Transitions to adjacent rooms with different flooring
When height conflicts occur, tile removal becomes the recommended approach rather than forcing an installation that creates ongoing functional problems.
For a rich, natural timber finish, these teak wood grain self-adhesive vinyl floor tiles are perfect for giving living areas or bedrooms a fresh new look.
Choosing the Right Type of Vinyl to Install Over Tiles
Different vinyl formats suit different tiled floors and project goals. Understanding your options helps you select the perfect match for your situation.
Floating Click-Lock Vinyl Planks
Luxury vinyl planks with click-lock systems are the most popular choice for DIY installation over tiles. These planks snap together along their edges and ends, creating a floating floor that sits over the tiles without adhesive. They’re ideal for reasonably flat floors and can be installed relatively quickly.
The floating nature accommodates slight movement and makes future removal possible if needed. This vinyl plank flooring works well in living areas, bedrooms, and hallways where a timber look is desired.
Glue-Down Vinyl Planks or Tiles
Where maximum stability is essential—busy kitchens, high traffic areas, or commercial spaces—glue down vinyl offers superior performance. The adhesive bonds the vinyl directly to the tile surface, eliminating any movement.
However, this method demands very clean, sound tiles and careful adhesive application. You may need to apply adhesive using a notched trowel and ensure proper adhesion by rolling the installed flooring. The cost and effort are higher than floating systems, but the result is exceptionally stable.
Sheet Vinyl
For larger, more open rooms where a seamless look is wanted, sheet vinyl eliminates visible joins across the floor area. Modern sheet vinyl can effectively hide grout patterns when the base is properly prepared and smoothed.
Installation requires careful templating and cutting to fit around cabinets, doorways, and other obstacles. Some products use peel-and-stick application while others require full-spread adhesive—always follow the manufacturer’s instructions for your specific product.
Peel-and-Stick Vinyl
This lighter-duty option suits very small areas with smooth, clean tiles. The self-adhesive backing simplifies installation, but preparation is critical. Any dust, grease, or residue on the tile surface will prevent proper adhesion and lead to lifting edges.
Peel-and-stick products are best considered a budget friendly option for temporary applications or low-traffic spaces like laundry cupboards.
Thickness and Wear Layer
Regardless of type, choosing thicker products with substantial wear layers pays dividends when installing over tile. Thicker vinyl better masks minor grout lines and provides a more solid, durable floor. Look for wear layers adequate for your expected traffic—higher in kitchens and hallways, potentially lighter in bedrooms.
If you prefer a lighter, contemporary aesthetic, the oak wood grain vinyl floor tile pack is an affordable option for achieving a modern timber-style floor in minutes.
How to Prepare a Tiled Floor for Vinyl
Proper preparation is the main factor determining how long vinyl over tile will last. Rushing this stage almost always leads to disappointing results.
Using a self-levelling compound may be necessary to create a smooth surface for vinyl flooring over tile. Using a self-leveling compound can help create an even surface ready for laying down new vinyl flooring.
Thorough Cleaning
Start by removing every trace of grease, dust, soap residue, and grime from the tile surface. Kitchen floors in particular accumulate cooking oils that can prevent proper adhesion of adhesives or interfere with underlays.
Use appropriate cleaners for your tile type, avoiding harsh chemicals that might leave residues. Rinse thoroughly and allow the floor to dry completely before proceeding. Moisture trapped beneath vinyl creates problems.
Repairs and Fixes
Address any tile issues before covering them. Replace or firmly refix any loose tiles using appropriate adhesive. Fill chipped corners with suitable filler. Examine grout joints for missing or deeply recessed sections that would create dips in your finished floor.
Deeper grout lines may require filling or leveling before installation of vinyl flooring. Grout lines between tiles can create an uneven surface that may affect the installation of vinyl flooring.
Filling grout lines is essential when installing thinner vinyl or sheet products. Apply thin-set mortar using a putty knife, spreading it evenly to bring grout joints level with the tile faces. Once dried, sand the filled areas with medium-grit sandpaper to create a smooth surface.
Levelling
Where tiles show significant variation—lippage, dips, or high spots—use a leveling compound to create a level surface. Self leveling compound flows into low areas and can be spread over the entire floor to achieve flatness. Follow the manufacturer’s guidelines for mixing ratios and drying times.
Surface Preparation for Glue-Down Products
If you’re installing glue-down vinyl or certain sheet vinyl products, glazed tiles may need light sanding or abrading to provide a key for the adhesive. This roughens the glossy surface enough to ensure proper adhesion. Always remove dust thoroughly after sanding.
Acclimatisation
Before installation, store your vinyl planks or sheets in the room where they’ll be installed for at least 24-48 hours. This allows the material to adjust to local temperature and humidity conditions, reducing the risk of expansion or contraction issues after installation.
As an alternative, homes and offices alike can benefit from the comfort and flexibility of carpet tiles, which are ideal for creating warm, modern interiors with simple installation.
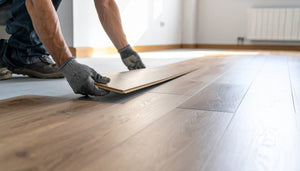
Installation Options: How to Lay Vinyl Over Tiles
The exact method depends on the vinyl product you’ve chosen, but the goal is always the same: a smooth, secure surface that performs well for years to come.
Installing Floating Click-Lock Planks
Floating vinyl installation begins with laying underlay if your product requires it (some luxury vinyl comes with attached backing). Many installations over tile use a thin vapour barrier—roll it out across the prepared tiles and tape the edges to secure it.
Plan your plank direction, typically running along the longest wall for the most appealing visual effect. Measure the room to determine whether you’ll need to cut the first row narrower to ensure the final row isn’t an awkward sliver.
Starting from the front right corner of the room, lay your first plank with the tongue facing the wall. Maintain an eighth to quarter-inch gap around all walls and obstacles—use spacers to keep this consistent. This expansion gap is essential; without it, the floor may buckle as materials naturally expand and contract.
Click subsequent planks together at the ends, then join each new row by angling the long edge into the previous row and clicking down. Stagger end joints by at least 200-300mm between adjacent rows for stability and a natural appearance.
Use a mallet with a soft face and tapping block for stubborn joins. Near walls, a pull bar helps you engage planks where swinging a mallet isn’t possible.
Installing Glue-Down Vinyl
Glue-down vinyl installation over tiles may require a skim coat or primer depending on the product and tile condition. Check manufacturer’s instructions before proceeding.
Apply adhesive over prepared tiles in small sections using the recommended trowel. Work in areas you can cover within the adhesive’s open time—typically 15-30 minutes depending on conditions.
Lay planks or tiles into the tacky adhesive, pressing firmly. Once a section is complete, roll with a flooring roller to remove air pockets and ensure full contact between vinyl and adhesive. Allow the floor to set before walking on it.
Installing Sheet Vinyl
Sheet vinyl demands careful measurement and templating. Create a paper or cardboard template of your room, including all doorways, cabinets, and obstacles. Transfer this template to your vinyl sheet and cut using a sharp utility knife or heavy-duty scissors.
Roll out the cut sheet in position, allowing edges to curve slightly up walls. Trim carefully to final size, maintaining a small gap at walls that will be covered by skirting. Depending on your product, either apply adhesive to apply adhesive across the entire floor or use perimeter-only adhesion.
Installing Peel-and-Stick Vinyl
Dry-fit all pieces first, planning your layout from a centre line or straight reference wall. Once satisfied, begin removing the backing and pressing tiles or planks firmly in place. Work outward from your starting point, ensuring edges align precisely.
A flooring roller helps ensure full adhesion across the tile surface.
Finishing Details
Complete your vinyl installation with appropriate trims and transitions:
-
Add scotia or quarter-round moulding where the floor meets existing baseboards
-
Install transition strips between different floor coverings in adjacent rooms to create a smooth transition
-
Trim door jambs and casings to accommodate the new flooring height difference—use a pull saw resting on a scrap piece of vinyl to achieve the correct height
Other Ways to Cover Old Floor Tiles Without Removing Them
While vinyl flooring is the focus here, some readers may want to compare it with other coverings that can also go over existing flooring.
Rugs and Runners
The simplest approach requires no installation at all. Loose rugs and runners can soften tiled floors in living rooms, hallways, and bedrooms instantly. They’re a temporary way to add warmth and comfort without any building work, though they don’t address the underlying dated appearance.
Carpet and Carpet Tiles
For bedrooms or home offices where a softer surface is preferred, carpet or carpet tiles can be laid over sound, clean tiles. This creates a completely different feel—warm, quiet, and cushioned. Carpet tiles offer easy replacement of worn sections.
Laminate and Hybrid Flooring
Other hard floor options can also be installed over tiles with appropriate preparation. Laminate flooring and hybrid flooring products typically require their own specific underlay and preparation steps. These products share the floating installation approach of vinyl planks but have different construction and performance characteristics.
Engineered Timber
Engineered wood flooring can sometimes be installed over tiles using floating methods. This delivers genuine timber surfaces while avoiding subfloor work, though it typically costs more than vinyl alternatives.
At factoryfast.com.au, we focus on supplying suitable products and materials for vinyl and other practical floor coverings rather than structural tile works. Our range lets you explore options that match your project goals and budget.
Maintenance Tips for Vinyl Flooring Installed Over Tiles
Once your vinyl is down over tiles, keeping it looking its best is straightforward. Vinyl is inherently low maintenance, but a few simple practices help it stay attractive for many years.
Regular Cleaning
Sweep or vacuum regularly using hard-floor settings to remove grit, sand, and dust. These small particles act like sandpaper under foot traffic, gradually wearing the surface. In high traffic areas like hallways and kitchens, daily sweeping makes a difference.
Damp Mopping
Damp mop periodically with mild cleaners formulated for vinyl floors. Avoid harsh chemicals, abrasive cleaners, or excessive water that could seep into joins. A well-wrung mop provides enough moisture to clean effectively without risking damage.
Never use steam mops on vinyl flooring—the heat can damage the material and compromise adhesives.
Protecting the Surface
Place felt pads under furniture legs to prevent scratches and indentations. This is particularly important for dining chairs that move frequently. When relocating heavy items like fridges, washing machines, or large dining tables, use furniture sliders or lift rather than drag.
Doormats at entrances help remove dirt before it reaches your new flooring.
Prompt Spill Response
In kitchens, dining areas, and entrance halls, wipe up spills promptly. While vinyl is water resistant, prolonged exposure to liquids—especially coloured substances like wine, coffee, or sauce—can potentially stain or affect edges and joins. Quick action keeps your floor looking fresh and helps prevent staining.
Avoid rubber-backed mats, which can cause discolouration over time. Use vinyl-safe mats instead.
When You Should Not Lay Vinyl Over Tile
In some situations, it’s better to remove tiles or seek further advice instead of covering them. Recognising these red flags saves you from wasted materials and disappointing results.
Severely Damaged or Loose Tiles
If tiles are cracked extensively, loose, or move underfoot when walked on, they don’t provide a stable base for any floor covering. Vinyl laid over such tiles will likely fail—the movement transfers through to the new surface, causing joins to open, edges to lift, or the material to crack. These floors need proper repair or tile removal before proceeding.
Significant Height Problems
When adding vinyl would prevent doors from opening, interfere with built-in appliances, or create awkward step transitions between rooms, the installation becomes impractical. Forcing an installation that creates functional problems leads to ongoing frustration. In these cases, tile removal remains the better path forward.
Unresolved Moisture Issues
Areas with known or suspected moisture problems under the tiles—whether from leaking plumbing, rising damp, or inadequate waterproofing—should not simply be covered. Moisture trapped beneath vinyl encourages mould growth and accelerates deterioration of both the vinyl and the structure. These issues require proper investigation and repair by appropriate tradespeople before any new flooring goes down.
When to Seek Professional Advice
If you’re uncertain about any of these factors, discuss alternatives with a flooring professional before ordering materials. A brief consultation can save considerable expense and frustration compared to discovering problems after installation.
Conclusion: Choosing the Best Way to Refresh Tiled Floors
For many Australian homes, laying vinyl flooring over existing tiles is a practical, cost effective way to update a room without the dust, noise, and expense of demolition. It’s a perfect solution when your tiles are sound but simply outdated—and it delivers results that can last for years with proper installation and care.
Remember the key steps that lead to successful installation:
-
Assess tile condition – confirm tiles are firmly fixed, reasonably flat, and dry
-
Choose the right vinyl product – match your choice to your room, traffic levels, and installation confidence
-
Prepare the surface thoroughly – clean, repair, and level as needed to create a stable base
-
Install carefully – follow the installation process for your chosen product, maintaining expansion gaps and finishing neatly
-
Maintain regularly – simple cleaning habits keep your floor looking its best
Plan your approach based on room usage. Kitchens and hallways often suit glue-down or thicker floating products for durability. Living areas and bedrooms can use standard luxury vinyl planks. Laundries need products with reliable water resistance.
Ready to transform your tired tiles into beautiful, modern floors? Explore the range of vinyl and related products available from factoryfast.com.au to find the flooring option that matches your project. With the right preparation and product choice, your new flooring is closer than you think.
FAQ
Can you lay vinyl flooring over tile exploring your options for different rooms?
Yes, you can lay vinyl flooring over tile in most rooms, including kitchens, hallways, and living areas. Choosing between floating vinyl planks, glue-down vinyl, or sheet vinyl depends on your space and traffic levels. This method offers a cost-effective option to update your floors without tile removal, providing a durable floor that is water resistant and low maintenance.
What preparation is needed before you lay vinyl flooring over existing tiles?
Proper preparation is key for a successful vinyl installation over existing tiles. The tile surface must be clean, dry, structurally sound, and free of loose tiles. Filling grout lines or using a self leveling compound creates a smooth surface, ensuring proper adhesion and preventing imperfections from showing through your luxury vinyl flooring.
How does laying vinyl flooring over tile eliminate the need for tile removal?
Laying vinyl flooring directly over existing tile eliminates the costly and labor-intensive tile removal process. This cost effective option saves time and reduces mess, making it ideal for budget-friendly renovations. It also avoids damage to the subfloor beneath, allowing for a quicker, less disruptive installation with a modern, seamless look.
Are there any height or transition concerns when installing vinyl flooring over tile?
Yes, installing vinyl flooring over tile will increase floor height, which can affect door clearances and transitions between adjacent rooms. Using transition strips helps create a smooth transition and protects edges. Planning for these height differences ensures your new flooring integrates seamlessly while maintaining functionality and aesthetic appeal.
Can vinyl flooring installed over tile handle high traffic and moisture-prone areas?
Luxury vinyl flooring installed over tile is highly durable, water resistant, and suitable for high traffic areas like kitchens and hallways. It offers a softer, warmer feel underfoot compared to tile floors and requires minimal maintenance. This makes it a perfect solution for busy households seeking a stylish and practical flooring option.
How long does vinyl flooring over tile typically last, and what maintenance is required?
With proper installation and care, vinyl flooring over tile can last 10-20 years. Regular cleaning with mild products, avoiding harsh chemicals, and protecting surfaces from furniture legs help maintain its appearance. Its low maintenance nature and resistance to stains and scratches make it an excellent long-term flooring choice for Australian homes.
-
 Tags:
Flooring
Vinyl Floor Tiles
Tags:
Flooring
Vinyl Floor Tiles