1300 760 441
 cs@factoryfast.com.au
Bath Screens: How to Choose the Right Shower Over Bath Screen

A shower over bath setup asks one screen to do two jobs: contain shower spray and keep the bath easy to use. That is why bath screens need to be chosen differently from standard shower enclosures. The right screen should suit the bath rim, wall position, shower spray direction and how people step in and out.
If you are replacing a curtain, the upgrade is not only about looks. A glass bath screen can make the bathroom feel cleaner, brighter and more permanent, while reducing the cling and splash issues that often come with fabric curtains.
Step One: Confirm the Bath and Shower Position
Before comparing styles, check where the shower head sits and which end of the bath receives the most spray. A bath screen is most effective when it protects the splash zone without blocking access to taps, shelves or the bath itself.
Measure from the bath rim upward, then measure the width available along the bath edge. Also check whether the wall is suitable for the mounting style. A screen with a wall channel needs a stable fixing surface, while a pivoting style needs enough movement space.
Step Two: Choose Between Fixed and Pivoting Bath Screens
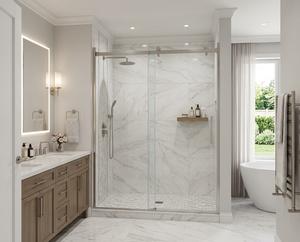
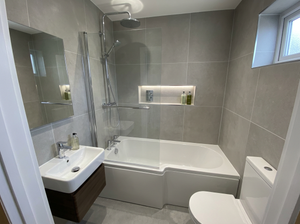
A fixed bath panel is simple and clean. It suits bathrooms where the shower spray lands in a predictable area and the household does not need the screen to move out of the way often.
A pivoting bath screen gives more flexibility. It can help with cleaning, bathing children or reaching fittings around the bath. The verified in-stock 180° 80x140cm pivot bath shower screen in black includes 6mm glass, an 80 x 140cm panel, a black frame, universal fittings, hardware and a shower screen seal. It can be installed on either side, which is useful when the shower end varies by bathroom.
When a Frameless Bath Panel Fits Better
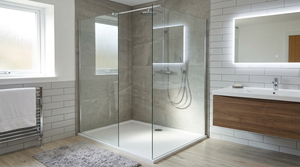
If the goal is a cleaner and more open bathroom, a frameless panel may be the stronger option. The verified in-stock 70cm frameless glass bath screen with chrome wall channel includes a 700 x 1450mm over-bath panel, 10mm clear tempered glass, polished edges, 2mm radius corners and a chrome anodised aluminium wall channel cut to size on installation.
That type of screen suits buyers who want a minimal line over the bath rather than a framed outline. The wall channel still gives the panel a defined fixing point, so the final look is simple without being visually flimsy.
Step Three: Do Not Adapt the Wrong Screen Type
A standard shower panel is not always the right answer for a bath. The bath rim, height, access point and splash direction are different from a walk-in shower zone. Compare the broader shower screens collection if you are still deciding between layouts, but use a purpose-built bath screen when the shower sits over the tub.
If you like the open look of frameless shower screens, look for a bath-specific version rather than assuming a standard panel will suit. Shower panels can work beautifully in walk-in settings, but over-bath layouts need different sizing and mounting logic.
Step Four: Match the Screen to How the Bath Is Used
A household that mainly showers may prioritise spray control and a more enclosed feel. A household that still uses the bath often may prefer a pivoting screen or a narrower fixed panel that leaves more open rim access.
Also think about cleaning reach. A fixed glass panel may look simple, but the area where the bath, wall and screen meet still needs to be accessible. A pivoting design can make cleaning easier if the bathroom layout allows the panel to move freely.
Step Five: Coordinate Finish and Glass Weight
Chrome is usually easy to match with existing bathroom fittings, while black can help a bath screen feel more architectural. Frameless glass keeps the room lighter, especially where the bath already takes up a large visual footprint.
Glass thickness affects the feel of the screen, but it should be considered alongside the mounting hardware. A thicker panel needs the right channel, hinge or support system, while a lighter pivoting screen may suit bathrooms where easy movement matters more than a heavy frameless look.
Plan the Bath Screen Around the First Splash Point
Stand in the bath area and point the shower head where it is normally used. The first splash point tells you more than the product photo. If the screen covers that zone while still letting someone step into the bath comfortably, you are closer to the right choice.
Frequently Asked Questions
-
 Tags:
Bath Screens
Tags:
Bath Screens