1300 760 441
 cs@factoryfast.com.au
Understanding Where to Place a Shower Niche in Your Bathroom Project

Key Takeaways
-
The best wall for a shower niche is typically an internal wall positioned away from plumbing runs and outside the main splash zone, while remaining within easy arm’s reach during your shower.
-
For a standing shower, position the centre of your niche approximately 1050–1150 mm (41–45 in) above the finished floor. For a shower-over-bath setup, the bottom edge should sit about 200–300 mm (8–12 in) above the tub rim.
-
The most common and practical locations are the wall opposite the shower head in an alcove shower, or the long back wall in a walk-in shower—chosen for both visual symmetry and reduced water exposure.
-
Avoid placing a niche on an exterior wall in cold climates, directly above complex plumbing, or through structural elements without proper engineering consultation.
-
Final placement must balance function (comfortable reach, bottle size accommodation, splash avoidance) with aesthetics (tile layout alignment, symmetry, feature wall impact) and should always be confirmed with your builder before construction begins.
Shop our wide range of shower niches now to find the perfect built-in storage solution for your bathroom renovation.
What Is a Shower Niche and Why Placement Matters
A shower niche is a recessed shelf built directly into your shower wall, designed to hold shampoo bottles, body wash, soap, and other shower essentials without cluttering your floor space. Unlike wire baskets that rust, suction caddies that fall, or corner shelves that collect soap scum, a properly installed built in niche becomes a permanent, waterproofed storage solution that looks intentional rather than added as an afterthought.
Because a niche cuts through your shower wall and into the wall cavity behind it, its position affects far more than convenience. You’re creating an opening that interacts with framing, insulation, waterproofing membranes, and your tile layout all at once. Early planning during your bathroom renovation is essential—moving a niche after waterproofing is applied typically means stripping everything back and starting again.
Poor placement leads to daily frustrations that compound over time. A niche positioned too high forces shorter users to stretch awkwardly. One placed in the direct spray path keeps bottles constantly wet and encourages grout line cracking from repeated saturation. Installing a niche on an outside wall in a cold climate can create condensation problems and cold spots that promote mould growth behind your tiles.
This article focuses specifically on where to position your niche in a 2025 bathroom build or renovation. We won’t cover waterproofing techniques or tiling methods in detail—the goal is to help you make confident decisions about location before construction begins, when changes are simple and free rather than expensive and disruptive.
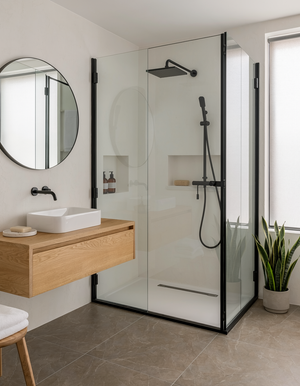
Check out this great niche for above bath or any shower
Key Decisions Before You Choose a Location
Before marking a specific spot on your shower wall, you need to settle three foundational questions: what type of niche you want, how large it needs to be, and who will actually use this shower daily.
Niche Types
Different niche formats have different spatial requirements. A single vertical niche fits neatly between standard wall studs spaced 400–450 mm apart without any structural modification. A custom horizontal shower niche spanning 900–1200 mm requires trimming studs and adding headers—significantly more work. Multiple niches or a stacked double-shelf design may work better in some layouts but demand more wall real estate and precise stud alignment. Your bathroom layout and existing wall studs will ultimately constrain what’s possible.
Sizing Considerations
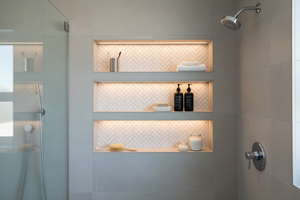
Typical internal dimensions for a single niche range from 300–400 mm wide by 300–600 mm high, providing ample storage space for everyday shower products. A relatively large shower niche or large horizontal niche designed as a design feature might span 900–1500 mm wide by 200–300 mm tall—essentially a full-width shelf across a feature wall. Vertical niches can stack two or three shelves within a single tall recess, maximising storage capacity in narrow showers where horizontal width is limited.
Before finalising dimensions, measure your tallest shampoo bottles and body wash containers. Modern bottles in 2025 commonly stand 230–270 mm tall. Add 30–50 mm clearance above to prevent items jamming against the niche top, and you’ve established minimum shelf height. Larger bottles and multiple family members with their own bathroom products quickly justify a large shower niche or multiple niches rather than cramming everything into one undersized recess.
User Needs
Consider who uses this shower regularly. Adults-only households can position niches at standard comfortable heights. Families with children benefit from two niches at different heights, or a tall vertical design with glass shelving at multiple levels. Households with ageing parents or anyone with mobility concerns should account for seated showering positions, which dramatically changes ideal placement height.
Finally, think about cleaning preferences. A very deep niche collects water at the back and requires more frequent wiping. Multiple small niches mean more niche edges and grout joints to maintain. These practical realities should inform your niche ideas as much as Pinterest inspiration does.
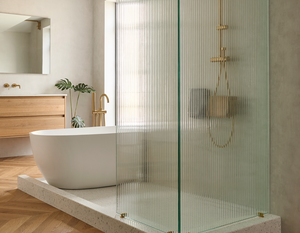
Need an trendy Arched Shower Niche ? Look no further
Ideal Height for a Shower Niche
Height determines whether your niche feels effortless to use or becomes an awkward reach every single day. The goal is a position where you can grab shampoo bottles without stooping, stretching overhead, or stepping out of your comfortable stance under the water.
Niche Height for Different Users
-
Standard Walk-In Showers (Adults): Position the centre of your niche roughly 1050–1150 mm (41–45 in) above the finished floor. This places the bottom edge at approximately 950–1050 mm (37–41 in), allowing easy access at chest to shoulder height for most users.
-
Bath-Shower Combinations: Position the bottom of the niche about 200–300 mm (8–12 in) above the tub rim, which typically places shelves around 600–750 mm (24–30 in) above the tub floor.
-
Households with Children: Consider either an additional lower niche or a taller vertical design with multiple shelves. A lower shelf at around 700–800 mm accommodates kids reaching their own products, while adult items stay at standard height above.
-
Very Tall Users: Users over 190 cm (6’3”) may prefer raising the niche by 50–100 mm to reduce any sense of stooping. However, avoid placing the bottom edge above about 1150 mm (45 in) unless you’re certain shorter household members or future occupants won’t need regular access.
-
Accessible or Ageing-in-Place Showers: For showers with bench seating, lower the niche to 600–750 mm from floor level to accommodate seated reach.
Choosing the Best Wall for Your Niche
Wall selection often matters more than precise centimetre measurements. The wall you choose affects waterproofing complexity, thermal performance, structural requirements, and how your shower design reads visually as a whole.
Internal vs. Exterior Walls
-
Internal Walls: Almost always preferred for niche placement. They maintain stable temperatures year-round, have no insulation batts that you’d need to cut through, and present fewer waterproofing complications.
-
Exterior Walls: Present genuine risks in cooler climates. These walls typically contain insulation and vapour barriers designed to prevent moisture movement through the building envelope. Cutting a niche through this assembly can create condensation points, cold spots, and pathways for moisture to reach timber framing. Unless your builder specifically confirms the wall can be safely modified, avoid placing a niche on an exterior wall or outside wall entirely.
Best Locations by Shower Type
-
Three-Sided Alcove Shower: The wall opposite the shower head is typically the best location. This position keeps the niche out of direct spray, provides a natural focal point when entering the shower, and usually corresponds to an internal wall without plumbing complications.
-
Two-Wall Walk-In Shower: The long back wall away from the shower head generally works best. This side wall offers the most uninterrupted run of tiles for a feature wall effect while keeping contents visible and accessible from anywhere in the shower.
Walls to Avoid
-
Valve Wall: Avoid the wall where your mixer, taps, and riser pipe are located. This wall already has plumbing penetrations that complicate waterproofing. Adding a niche means more cuts, more membrane work, and positioning directly in the heaviest splash zone near the shower head.
Checking for Obstructions
Before committing to any wall, check what’s behind it. Stacked plumbing from upper floors, electrical runs to exhaust fans, structural posts, or rangehood flues can all lurk inside wall cavities. Your builder can inspect during framing, or you can use a stud finder and a careful look at drawings to identify obstructions.
Style Considerations
-
Feature Wall: Long back walls often make niches into a visual focal point, especially when using contrasting tiles or LED lighting.
-
Minimalist Design: Side wall placement minimises visual impact for those preferring minimalist bathroom design.
Balancing Practicality and Aesthetics in Niche Placement
The tension between a perfectly centred, symmetrical niche and a spot that actually works best daily is one of the most common decisions in shower niche planning. You want your new bathroom to look intentional and considered, but also to function smoothly every morning.
Understanding the Splash Zone
This is the area in direct line with your shower head or rain shower where water hits constantly. Bottles stored here stay perpetually wet, soap residue builds faster, and the constant moisture accelerates any waterproofing weaknesses. Research suggests positioning niches just outside direct spray can reduce saturation by up to 70% compared to head-on placement.
Aesthetic Choices
-
Centring a single niche on the back wall for symmetry
-
Aligning niche edges precisely with grout lines so the same tiles frame the opening cleanly
-
Flanking a central rain shower fitting with two niches for a hotel-spa effect
Practical Patterns
-
Many people prefer the niche on their dominant-hand side—right-handers reaching naturally to the right wall, left-handers the opposite.
-
Shoulder-height placement next to (not under) the shower head keeps products one step away without direct water bombardment.
-
In a shower with a bench, a lower niche at seated elbow height serves anyone using the bench while a standard-height niche works for standing users.
Testing Niche Position: Step-by-Step
-
Use painter’s tape on bare framing or waterproofed walls to mark the exact niche outline at full size.
-
Stand in the shower area, hold a dummy bottle or shampoo container, and mime your morning routine.
-
Check if you can reach without stretching.
-
Ensure you can see what’s in the niche without craning.
-
Assess if the tape position feels natural.
This five-minute test prevents years of minor daily annoyance.
Matching Niche to Shower Size
-
900 × 900 mm alcove shower: Typically one compact niche works best, centred on the back wall at standard height.
-
1700 mm walk-in shower: Allows more creativity: perhaps a horizontal niche spanning half the back wall, or two niches at different heights for different users.
Common Placement Mistakes to Avoid
Certain niche placement errors are expensive and disruptive to fix once tiles are set. These mistakes are worth eliminating from your plans before any work begins, when changes cost nothing but a few minutes with a pencil and eraser.
-
Placing a niche too close to the shower head: Guarantees constant water exposure, rapid soap scum build-up, and stresses waterproofing seams. Keep a minimum 300–400 mm horizontal distance from direct spray paths.
-
Making niches too shallow for modern bottles: Today’s shampoo bottles and body wash pumps need 90–120 mm finished depth to sit securely without tipping. Shallower than 80 mm leaves bottles precarious.
-
Installing a niche directly under a frameless glass panel: Creates a drip collection point. Water running down the glass pools on the niche’s top edge, soaking contents and staining tiles.
-
Cutting through structural studs without proper framing: Any niche over about 350 mm wide will span at least one stud. That stud needs proper headers and trimmers added—structural reinforcement isn’t optional.
-
Placing niches too high or too low: A bottom edge above 1400 mm (55 in) forces shorter users to reach overhead. A top edge below 800 mm (31 in) means bending every time you grab shampoo.
-
Interrupting strong tile patterns: Cutting a niche through the centre of a major motif looks accidental rather than designed. Consider shifting niche placement by one tile width to frame the pattern properly.
-
Adding multiple niches too close together in compact showers: Every niche edge adds grout joints and tile cuts. Sometimes one well-designed custom niche with internal glass shelving provides better storage capacity and cleaner aesthetics than three small recessed shelf openings crowded together.
Coordinating Niche Placement With Waterproofing and Structure
Your niche location must be finalised before waterproofing membranes and tile backer board are installed. Changing your mind after membrane application typically means stripping back to framing and starting waterproofing again—expensive, time-consuming, and avoidable with proper planning.
Framing Considerations
-
Standard Framing: Standard residential framing spaces studs at 400 or 450 mm centres in most 2025 Australian and North American builds. A single niche fitting between two studs requires only added noggins (horizontal blocking) at top and bottom to support the backer board and create a solid fixing surface.
-
Long Horizontal Niches: Spanning 900–1500 mm requires trimming one or more studs and installing proper headers and trimmers to maintain wall integrity. This work must comply with local building codes.
Waterproofing the Niche
-
The waterproofing membrane must wrap continuously through your niche: up all internal side walls, across the back, and covering the base with a slight slope (about 1:40 or 1/4 inch per foot) toward the shower floor for drainage.
-
Prefabricated foam or tile-ready niches simplify waterproofing significantly—they arrive as sealed units that integrate with membrane systems. However, their fixed dimensions often dictate where the niche can physically fit between your existing wall studs.
Finalising Niche Layout
-
Lock in your niche layout on construction drawings before ordering anything else.
-
Note exact dimensions: height to bottom edge, height to top edge, horizontal position from a fixed reference point.
-
Share these with your glass shower screen supplier if applicable—niche positions affect screen dimensions and panel locations.
-
Confirm with your tile supplier that your wall tiles work with the niche proportions, ensuring you achieve full tiles around the opening where possible.
Integrating Lighting and Design Features Around the Niche
While lighting and trim are secondary to getting location right, they can influence where a niche makes the strongest visual impact in your bathroom design.
LED Lighting Considerations
-
LED lighting inside or above a niche adds genuine practical value, illuminating contents in showers that might otherwise be dim.
-
Installation is easiest on internal walls where cable runs can access ceiling spaces without navigating insulation and vapour barriers.
-
All wiring must be rated for wet areas (IP65 or higher for anything inside the shower zone) and planned before waterproofing so cables and LED drivers are protected from moisture ingress.
Design and Trim Options
-
Contrasting tiles on the niche back to create visual depth
-
Matching grout lines precisely with surrounding wall tiles for a seamless look
-
Using metal trim strips or mitred tile edges to frame the opening crisply
-
Aligning your niche with other horizontal features creates visual coherence (e.g., matching the top of a bench with the bottom of the niche)
Real-World Arrangements
-
Floor-to-ceiling vertical niche with multiple shelves at one end of a long shower, creating a “wet room wardrobe” effect
-
Twin niches symmetrically placed either side of a fixed window, framing natural light
-
Single custom built horizontal niche spanning the full width of a back wall above bench height, essentially a continuous extra storage ledge
Check out our range for great Bathroom Lighting ideas
Conclusion: Locking in the Right Position for Your Project
Ideal niche placement combines an internal wall, a comfortable reach height between approximately 950–1150 mm for most adults, and a position just outside the heaviest splash zone while remaining convenient for daily use. Getting all three factors aligned transforms a simple recessed shelf into genuine shower storage that feels effortless every morning.
Your measurements should be tailored to your household—your family’s heights, your chosen product sizes, your specific shower dimensions—not just generic averages copied from a website. Mock up the position with tape, test reach with actual bottles, and confirm the location on-site before framing is closed and waterproofing begins.
Sketch your shower elevation with precise niche dimensions marked: height to bottom edge, height to top edge, width, depth, and distance from fixed reference points like corners or the shower head. Review this sketch with your builder, tiler, or designer before approving final construction drawings. These conversations cost nothing but prevent expensive mistakes.
Thoughtful shower niche planning in 2025 future-proofs your bathroom build for changing household needs—whether that’s children growing taller, ageing parents moving in, or simply your own preferences evolving over time. A well-placed niche remains useful and attractive for decades, while a poorly placed one becomes a nagging reminder of what could have been.
FAQ
Can I add a shower niche to an existing tiled shower, or is it only for full renovations?
Adding a niche to an already-tiled shower is technically possible but significantly more invasive than including one during initial construction. The process requires cutting through existing wall tiles, removing tile backer board, inspecting framing, installing a waterproofing membrane over the new opening, and re-tiling the entire affected area to achieve proper waterproof continuity. This work makes most sense when you’re already doing a larger repair or partial remodel. Before committing, get a contractor’s quote—the cost may approach that of a more complete bathroom renovation where you’d have greater design flexibility.
How deep should a shower niche be for modern shampoo bottles?
A finished internal depth of about 90–120 mm (3½–4¾ in) accommodates most 2025 shampoo, conditioner, and body wash bottles comfortably. Going much deeper than 120 mm creates a cavity that collects water at the back, requires more reaching, and becomes harder to keep clean. Shallower than 80 mm causes taller bottles to tip forward or perch precariously. When planning, account for the tile thickness and backer board that will reduce your rough framing depth to the final usable dimension.
Is a corner niche better than a recessed wall niche for small showers?
Corner niches or triangular corner shelves save wall space and can be easier to retrofit in some situations, making them tempting for tight showers. However, they typically hold less than a properly sized wall niche, and their diagonal position exposes contents to spray from multiple directions. A recessed wall niche planned during renovation offers neater sight lines, more usable storage capacity, and better protection from direct water, even in compact 800–900 mm wide showers. Corner solutions work best as supplementary storage or when wall niche installation isn’t feasible.
Should I install more than one shower niche in the same shower?
Multiple niches work excellently in larger walk-in or double showers. A common approach places one niche at standard height for everyday adult products and another higher or lower for razors, children’s items, or decorative pieces. This avoids the overcrowded “shampoo Tetris” problem where everyone’s products compete for limited space. In very small showers, however, one well-proportioned niche usually looks cleaner and provides sufficient storage without the visual busyness of multiple openings with extra grout joints and tile cuts.
Do I need a professional designer to decide where my niche goes?
Many homeowners successfully plan niche placement themselves using height guidelines, tape mock-ups, and careful consideration of their shower layout. For straightforward alcove showers with standard dimensions, self-planning works well. However, a designer or experienced tiler adds significant value when integrating the niche with complex tile patterns, coordinating with glass screen positions, planning LED lighting, or navigating structural changes. For bathroom builds involving expensive feature tiles or unusual layouts, professional input helps avoid costly errors and often identifies opportunities you might miss.
-
 Tags:
Shower Niches
Tags:
Shower Niches